Cool Stitchings!

I have been excitedly stitching my “Bed of Roses” together in the basement where it is nice and cool.

DSCN7929

DSCN7931

DSCN7945

I am loving this quilt more with every row I add.  Speaking of adding rows, the pink cornerstones add a lovely touch, don’t you think.  They finish at just 1/2″ square.  Dainty!

DSCN7930

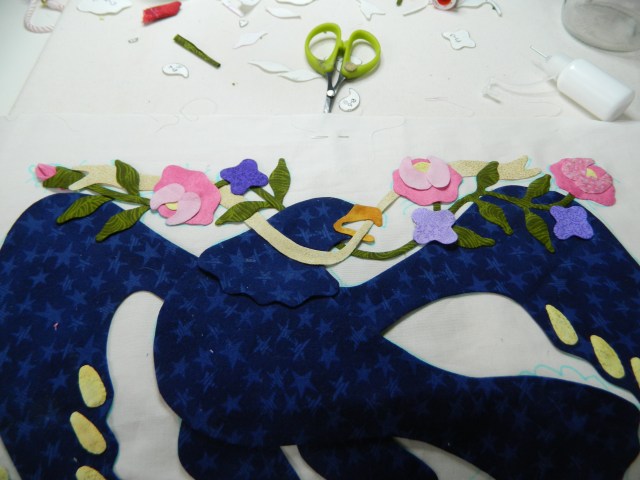
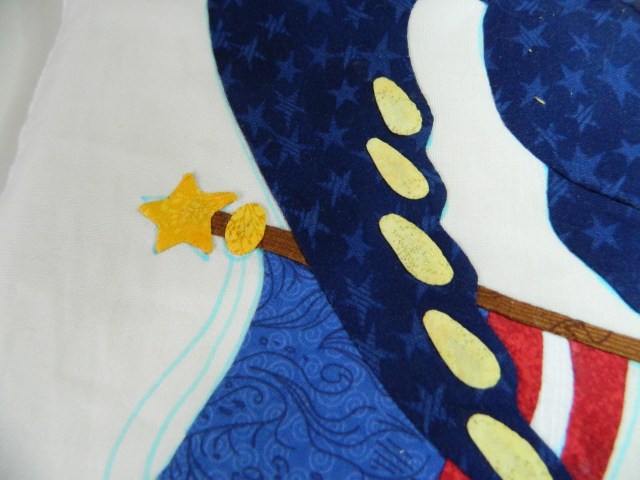
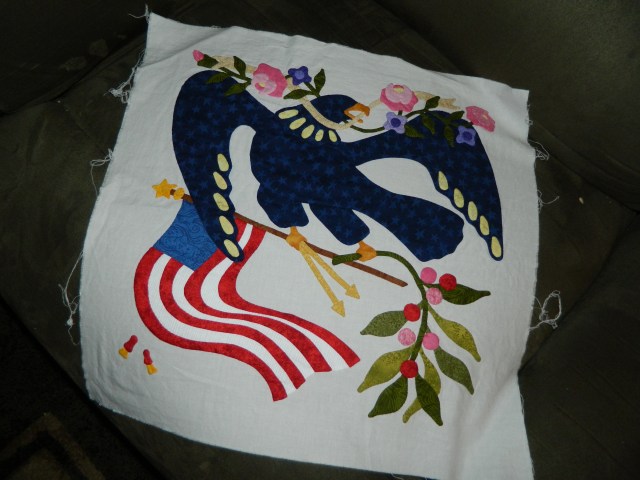
In my usual fashion, I stopped working on Bed of Roses for a day or two to start a new quilt.  I guess as I see the end in sight for one quilt, I have the need to start something new.  I honestly think it is fear of having absolutely nothing to do!  The new quilt is called “Love At First Sight” and it is from Edyta Sitar’s book Handfuls of Scraps. I am making it out of my “real scraps” not layer cakes or jelly rolls.  No no!  The fabrics I am using are scraps left over from finished projects.  So it takes a bit longer to do the cutting, but I am actually using up some leftover bits of fabric that have been kicking around for years!  I am sure you know the feeling.  Notice that I am keeping the blocks from Bed of Roses in my sight line just so I remember there really is a quilt to finish!

DSCN7923

In an earlier post, I showed you how to do the scallops on the borders of Bed of Roses according to the directions in the pattern. It really is a slick way to do those scallops.  You can see that post here.

But I was laying awake one night and came up with an alternate method to do the borders.  There is always more than one way to skin a cat.  Speaking of cats….have you ever tried to sew with a cat on your lap?  It is not easy.DSCN7926

Anyway,  here is an alternate way to do the borders.

First, cut a plastic template of the scallop provided in the pattern.  Then cut yourself some freezer paper templates.  I cut 6.  When you trace the template on the freezer paper, make sure you butt them up against each other.  Now, take a pencil and draw a line through both freezer paper templates at the exact point where they touch.  You can cut the templates out now.

DSCN7936

Ok, now you can take the plastic template and trace 15 scallops on the border fabric with a water soluble marker.  I drew the 1/4″ seam allowance along the edge because there is no seam allowance included in the template.  There is an odd number of scallops, so I found the centre point of the border and drew the first one in the middle, and then 7 scallops on each side of that one.

DSCN7933

So now I started to prep the scallops.  Here is the key…On 8 of the scallops, you will prep the entire piece (except the bottom seam allowance).  So far, so good!

DSCN7947

On the remaining 7 scallops, put a clip about 1/8″ below the pencil line you drew.

DSCN7937

Next you can prep the top section of the template.  I think this just might work!

DSCN7941

Once all the pieces were prepped, I took the plastic template and placed it on the top of the fabric and drew the remaing seam allowances.  You will be glad you did this!

DSCN7940

Now comes the moment of truth!  So glue the partially prepped pieces on the background on every other scallop, referring to the pattern for colour placement.

DSCN7942

Now you can glue the totally prepped piece in place.  Easy Peasy!

DSCN7943

DSCN7944

Til next time….

Kerry

Now I Can Relax!!!

The contracts are signed.  The patterns are designed. I have stitched my class samples and submitted class descriptions and supply lists.  Now I can finally tell you my exciting news…..I will be teaching two classes at Barbara Blanton’s Academy of Applique!   Pinch me!  I must be dreaming, but the last time I checked, my photo is up there with some pretty amazing world-class teachers, so it must be true!

DSCN7915

As much as I would love to show you my class samples, the teachers have been asked to keep their samples under wraps until the catalogue is published.  Sorry, but this is all I can show you…

DSCN7896
Anyway, now that my samples are finished,  I can finally start to put my Bed of Roses together.  I must confess, I have not finished all of the side triangles (or borders).  But I do have enough that I can get going!  I also know that once I see a few blocks stitched together, I will be very motivated to get things finished.

Ok, so I want to show you how to trim the side triangles and corner triangles.  The instructions are written very clearly in the pattern, but I just wanted to give you a few pointers.

Cut 2 pieces of freezer paper 15″ square.  Cut one of the pieces on the diagonal to end up with 2 triangles.

DSCN7900

Next, cut the second piece of freezer paper on the diagonal twice to end up with 4 smaller triangles.  So far, so good!

DSCN7901

So let’s start with the smaller triangles.  Basically, we are going to iron a freezer paper triangle (FPT) on to the right side of the 4 corner triangles.  First, I placed the FPT on the paper pattern and traced a few leaves, just to make sure I could line the pattern up and everything would be centered.

DSCN7902

Next, I ironed the FPT on top of the stitched triangle, placing the drawn leaves directly over the stitched leaves.

DSCN7903

It should look something like this.  As you can see, I am doing both triangles at once.

DSCN7904

Now, we are going to machine stitch 1/8″ away from the FPT, just on the bias edge.

DSCN7905
This next part is super-important, so if you remember only one thing from this post, make sure it is this!  The FPT does not have any seam allowance included, so you must add 1/4″ seam allowance to the fabric.

DSCN7908

Once the triangle is trimmed, you can remove the FPT.

DSCN7909

So now you can repeat the same process  with the remaining 3 corner triangles.  Then you can trim down the 8 side triangles, but this time you will be using the larger FPT.   Sometimes it is hard to tell what Bruin is thinking, but I think he is pretty impressed!!

DSCN7913

Til next time….

Kerry

Finally! Details of New BOM!

I am very excited to announce my new Block of the Month!  With Sue Garman’s permission, I am combining two of her fabulous quilts, “Friends of Baltimore” and “Baltimore Squared”.  We will be stitching 9 of my favorite blocks from “Friends of Baltimore” and using the setting from”Baltimore Squared” to bring the blocks to life.  Of course, you can expect a step-by-step tutorial on my blog for each block and also any finishing techniques.  I can’t wait to begin and I hope that you will join me!  I truly believe that every appliquer has a Baltimore quilt in them and I hope this is it!

So this BOM is set up differently than the last two and  you will find it much more convenient.  When you sign up, you will enter in your credit card information, and your card will be automatically charged each month.  You won’t need to order each block individually.  Yippee!  You can sign up for “Friends of Baltimore/Baltimore Squared” on my website.  Sign-ups will begin today (Canada Day!) and continue until August 31.  When you sign up, you will be paying for Block 1.   On September 1, I will ship Block 1 to everyone that has signed up.  On October 1, your credit card will be charged for Block 2 and then I will ship them out the following day.  Much easier to you (and me!).

I can’t tell you how thrilled I was when I found out my “Friends of Baltimore” was awarded the Excellence of Workmanship in Applique at Quilt Canada a couple of weeks ago.  Pinch me, I must be dreaming!!!  Since this is like the Academy Awards of Quilting, I would like to thank Sue Garman for creating such an awesome pattern and for being such an inspiration to me…..I would like to thank Ruth Quinn of Stitching Impressions  for the truly amazing machine quilting that she did.  I would especially like to thank Colleen Dadd who convinced me to “just throw the quilt in the washing machine” and who also took the time to re-wash the quilt so she could block it for me.  And I would like to thank everyone who commented on my blog posts and encouraged me to keep going on this quilt.  I thank you all from the bottom of my heart!!

20160618_161451

Moving right along….I finished the borders for my Trail Mix quilt.  How lucky was I to find the exact shade of brown I was looking for in my very own stash??  I love when that happens!!

DSCN7865

First border is on…and it fits perfectly!!!  Interesting…..I just noticed one of the blocks in the border is going the going the wrong way…..such is life!

DSCN7868

Finished!!!  OK, I just noticed that a lot of the blocks in the border are going the wrong way.  What else can you do but laugh???

DSCN7873


Til next time…..

Kerry

A Good Day to Stitch!

There is nothing I love doing more than quilting.  And by “quilting” I mean anything that has to do with making a quilt.  Obviously, my first choice is always to applique the day away, but today I am sitting at my sewing machine, sewing the borders for “Trail Mix”, a scrappy quilt I started a while back.  “Trail Mix” is a quilt designed by Edyta Sitar.  It is available on Craftsy and is one of the best classes I have taken.  So much useful information!

So, you may remember, I have stitched all of the blocks together.  It was a lot of stitching (and I do mean a lot), so I think I may have needed a bit of a break from it….I am sure you know the feeling!

IMG_0095

I am now ready to start the borders…so I spent most of yesterday sewing strips together and cutting the strips into triangles using an acrylic template.  Next, I stitched those triangles together in pairs.  So far so good!

DSCN7857

DSCN7858

Next I took all of those half square triangles I made…

DSCN7859

…and stitched them together.  I must confess I have become very addicted to half square triangles.  Very addicted.

DSCN7860

So, next I took those sections and stitched them to the triangles made from strips.  Sweet!  Of course, I was simply thrilled that (almost!) every piece fit the way it was supposed to.  Thank You, Quilt Gods!!

DSCN7861

So now, I can start to put all the pieces together.  So excited!!

DSCN7862

As if that isn’t exciting enough, Quilt Canada is just around the corner!  I am so happy to  tell you my Friends of Baltimore designed by Sue Garman  and machine quilted by Ruth Quinn of Stitching Impressions was juried into the show.  Here is the label, which I was frantically stitching on the morning the quilt was to be dropped off, but that is another story.

DSCN7856

For those of you who have been wondering…Yes I will be doing another Block of the Month!  The patterns are picked, the fabrics are chosen and I am raring to go!!  I will have all the details in my next post!

Til next time….

Kerry

Wrong fabric:( Yikes!!

These things are bound to happen.  I was just getting ready to cut some blocks for “Bed of Roses” to ship out.  While I was getting ready to cut  the white backgrounds for the blocks, I happened to notice it looked a little whiter than I remembered.  You guessed it, the bolt I have been cutting from for the last 2 months worth of blocks is the wrong white.  My sincerest apologies.  Please, please check through any blocks you received in the last 2 months (check both blocks and borders) and take out the white background.  Compare it to the previous blocks and you will be able to see the difference.  Very close, but very different.  I will replace all of the “wrong” background and replace it with the “right” background.  Free of charge (of course) and free shipping.  Please email me and let me know what you need.

Last post I showed the step-by-step photos of The Glorious Eagle Block I taught at the Wiltwyck Quilt Guild in Kingston, NY.

DSCN7843

This post I would like to show The Braided Basket block.  It is a little more challenging, only because there are a few more pieces and it has a fair bit of layering.  If you are planning on making this block, the first question you will probably ask is “Where do I start?”  Well, you can start with the basket.

I made all of the bias strips for this basket with my 1/4″ bias maker.

DSCN7791

DSCN7794

DSCN7795

I used three bias pieces to make the braid for the edge of the basket.

DSCN7799

Once you have built this much of the basket, you can start to fill it with flowers and leaves.  To make life easier, I store all the prepped flowers and leaves in zip lock bags.

DSCN7802

So I started with some leaves.

DSCN7804

Next I added the flowers.

DSCN7806

I added more flowers and a small part of the braided section.

DSCN7809

DSCN7814

DSCN7822

DSCN7823

This block is put together much like a jig-saw puzzle.  Every piece has to fit in it’s own spot!

Once all of the flowers and leaves were glued in place, that left room for the bird, which is glued in place on a piece of freezer paper (shiny side up).  The bird is then lifted off the freezer paper and glued onto the background.DSCN7827

DSCN7849

DSCN7850

DSCN7851

This block is not finished yet.  I still need to stitch the blue bow on the handle and trim the long piece of braid.  Lovely!

DSCN7854

Til next time….

Kerry

Thank You, Wiltwyck Quilters!

This past weekend I had the privilege of spending time with the Wiltwyck Quilters Guild in Kingston, New York.  I want to thank everyone in the guild for making us feel so welcome, especially Susan, who contacted me over a year ago and invited me to do a Trunk Show and to teach a couple of workshops for their guild.   Colleen (from Elite Quilting) came with me to share in the 7 hour drive.  Lucky me, Colleen did all of the driving. There and back!

Here I am talking about my quilts (one of my favourite things to do!).   They loved my accent.  I loved theirs.  It was all good!

IMG_2470

After the guild meeting, I taught some very enthusiastic ladies The Glorious Eagle block from Sue Garman’s “Friends of Baltimore”.  I told them I would post some step by step photos, so here they are…

First we started with the flag.  You can see that the red stripes are prepped and then glued on to the full size white piece.  Notice the bottom of the blue section is tucked underneath the stripe.

DSCN7744

Once all the stripes are stitched in place, the outer white section can be trimmed away from the top and bottom.  By the way, this technique is called “off-block construction”.   Because it is constructed off the block!

DSCN7746

So you can see I trimmed the outer section of the white away and now this entire piece can be glued on the background.

DSCN7747

Next the leaves are added.

DSCN7748

Then the flagpole, the stem and berries (in that order).

DSCN7751

Next we added the feet (tricky, yes , but you can do it!)  and the legs.

DSCN7754

Now you can add the wings and the body.  Once you get this far you will want to give yourself a pat on the back!!

DSCN7755

You can prep this stem/leaf section in one piece if you are brave.  Or you can cut it up into a stem and leaves like I showed you.  Your choice!

DSCN7757

You can add the ribbon, and the leaves and stem.

DSCN7758

Then add the pretty pink and purple flowers.

DSCN7760

At this point you can add the eagle’s head and skinny stems.

DSCN7761

And now you are able to add the second part of the ribbon.

DSCN7763

Notice that the ribbon goes under one section of the beak and over the other section of the beak.  Tricky!

DSCN7764

So now you can just add the rest of the leaves and stems and rosebud.

DSCN7770

Sweet! And simple, no?

DSCN7771

I used a pale yellow for the star and oval section of the flagpole, even though I thought it might be a bit drab.  I was right.  Drab.  So I unstitched it and used a bolder yellow.  Never be afraid to switch out a part of the block if it doesn’t turn your crank!

DSCN7774

That’s more like it!

DSCN7775

And here is the (almost!) finished block.  I just need to do a bit of embroidery and give the eagle an eye.  We were lucky enough to have access to a sink during the workshop, so I showed the class how I wash a block.  In my next post, I will show pictures from The Braided Flower Basket class.

DSCN7848

Til next time…..

Kerry

Bed of Roses – Month 12

We made it!  Can you believe a whole year has come and gone since we started Sue Garman’s “Bed of Roses”?

In this month’s package, you will receive the fabric for the last border and the remaining fabric for the scallops.  I must confess, I am behind on my borders so I better get stitching!  You will also receive enough fabric for the sashing cornerstones, floater and sashing strips, outer border cornerstones and the binding.  Have you thought about which fabric you will use for the backing? You have a choice of 4 backings and they are available on my website.

I am so eager to start stitching the blocks together, but first I need to wash (yes, wash!)  and trim the blocks to the correct size.

If you have been following my blog you know I like to wash my blocks when I am finished the applique.  I do this so I can remove the blue water soluble marker that I use to trace the pattern onto the background fabric.  And I need to remove the glue.  I just fill the sink with hot, soapy water and toss the block in.  Really, it’s that simple!  For more details, watch the Youtube video here.

DSCN7772

I usually let it soak for about an hour so.  Next, I rinse the block under running water and then lay it out on a towel.  Don’t wring the block out!  If you leave the block fairly wet, it will dry without too many wrinkles.

DSCN7773

Once the block is completely dry, I iron if from the wrong side.

DSCN7785

Now it’s time to trim the blocks to the proper size (15 1/2″).  Instead of measuring each block (way too fiddly) I cut a 15 1/2″ square in a piece of corrugated plastic and used it as a “window template”.  I used this  same method  to measure the blocks for my Friends of Baltimore quilt.  You can see that post here.  Since the blocks in both quilts are the same size, I was able to use this template for both sets of blocks.

DSCN7788

DSCN7787

Once my blocks are all trimmed I will start sewing them together, and of course I will share my progress with you.

Very often I am asked how I choose my fabrics.  I love tone-on-tone in clear colours that have a little something going on, but not too much going on (if that makes sense!).  I have put together a collection of 13 delicious tone-on-tones that I cannot live without!  I have these fabrics available on my website in Fat Eighths Bundles (an ideal amount for hand-applique) and, also Fat Quarter Bundles.

DSCN7783

Later this month I am heading off to The Wiltwyck Quilt Guild in Kingston, New York to teach 2 workshops and to do a Trunk Show.  I couldn’t be more excited!!  Here is a sneak peek of one of the blocks we will be doing.  I can’t wait!!

DSCN7764

Bruin always likes to give me  his input when it comes to which colour of thread I should use:)  Speaking of thread, I will be adding my favourite hand-applique thread,  Mettler 60, to my website in the very near future.  I will keep you posted!

DSCN7765

Til next time….

Kerry

A Lovely Trip!

Words can’t describe how much I enjoyed visiting England and Amsterdam.  I loved England.  It felt like I was in Canada, except for the wonderful accents and the whole driving on the wrong side of the road thing. We visited Windsor Castle, Buckingham Palace, Liberty of London (of course!) and more than a few traditional British pubs.   I especially loved Amsterdam and felt like I was in a completely different world. The language, the bikes, the floral arrangements everywhere, the history, the food and friendly people….

IMG_2261


IMG_2263

IMG_2264

IMG_2256

IMG_2255

IMG_2253

IMG_2246

IMG_2244

IMG_2242

IMG_2238

IMG_2241

IMG_2217

A day or two before we were to leave on our trip, I picked up the latest edition of Quiltmania No. 111.  I figured it would give me something to read on the plane and in the hotel room.

DSCN7718

As I was casually leafing through the magazine, I noticed Part 1 of a new mystery quilt called “Discovery”.  (I am always up for a mystery!) I was intrigued.  Then I noticed the pattern uses Dutch Heritage Fabrics.  Again, I was intrigued.

DSCN7719

And I thought it was a bit of a happy coincidence that we were going to Amsterdam and I might just have to see these Dutch Heritage Fabrics in person.  The word “omen” popped into my head.  I turned a few more pages and saw that the fabrics are available at these locations.

DSCN7720

It didn’t take me long to hop onto Google Maps and find out that Den Haan & Wagenmakers was about a 10 minute drive from where we were staying.  Can you feel the excitement building?  Anyway, I went to the shop and was overwhelmed with the beautiful sample quilts and fabrics.  Elsbeth was kind enough to show me the first part of the mystery quilt.  That sold it for me.   Long story short, I am now the proud and excited owner of the first installments of the mystery quilt using the Dutch Heritage Fabrics.  I can’t wait to start!!

DSCN7721

Even though I came home with these quilting goodies and so much inspiration, I promised myself before I even took the fabric out of the packages, I wanted to start Parts 1 and 2 of Hazel, a free BOM by Esther Aliu.  Last year I bought these fabrics, and in hindsight I may have gone a little crazy.  But, it was my birthday, I was in a quilt shop and the fabrics were on sale.  On sale!  I have been patiently waiting for the perfect project to come my way so I can start cutting this fabric up. Hello Hazel!!

DSCN7722

DSCN7723

I knew I wanted to fussy cut the fabrics for the star.  I made a template and cut out 8 exact pieces.

DSCN7689

DSCN7691

When I trace my templates, I cut on the inside of that line, so that the fabric piece does not “grow”.

DSCN7692

DSCN7693

Whenever I stitch something together that has set in seams, I always take the time to draw on the 1/4″ seam allowance on all of the pieces.

DSCN7695

DSCN7699

So, next, I started to stitch the pieces together.

DSCN7702

I always use a stiletto when I get to the end of the stitching line, just to keep things straight.  This stiletto also has a flat surface on the end, which I used to flatten the seams, rather than an iron.  Very handy and available on my website!

DSCN7703
DSCN7710

DSCN7711

DSCN7712

Here is the finished star and I am not going to lie, I am pretty excited!!

DSCN7717

Til next time….

Kerry

Bed of Roses – Block 10

March 1st is still a few days away, but I want to post Block 10 before the beginning of the month. My husband, Paul,  and I are off to England and Amsterdam on March 3 for 10 days, so I am eager to ship Block 10 out before we leave.  All orders received after March 3 will be shipped when I get back home.  All 10 blocks of “Bed of Roses” are available on my website Simple Bird Studio.  

This month’s block consists of 2 identical blocks, which are fairly easy.  I haven’t stitched my blocks yet (the pieces are glued in place).  I am going to take these blocks with me on our trip. It’s not that I think I will have lots of free time to stitch.  Quite the contrary!   Its just that I get really antsy when I do not have a needle and thread in my hand. I am sure most of you can relate!!

It made sense to prep both blocks at the same time, so that is what I did.  First, I marked the pattern onto the background with a water soluble marker.  Then I made some 1/4″ bias for the stems and glued them in place.  You can see how I make my bias strips here.

IMG_2062

Next, I added the leaves. Because all of the shapes in this block are symmetrical, I photocopied the pattern pieces onto freezer paper to make my templates.

IMG_2063 (2)

So, next I added this cute little flower.  I find it very helpful to draw the seam allowance onto the piece of fabric.  It just makes it so much easier to line up multiple pieces.  You can read more about this technique here.

IMG_2064

IMG_2065

Notice when I clip the inside curve I don’t clip all the way to the freezer paper.

IMG_2069

Looking good!

IMG_2068

As I mentioned, both blocks are the same, but the pink fabrics are not the same, so read the pattern carefully!

IMG_2071

The way this next centre part is put together is very slick!  First, cut the entire freezer paper template out, but keep it as one piece.

IMG_2082

Since the outer ring is pink (R1) I will prep it first.  I iron it onto the back of the fabric and use liquid starch and a mini iron to press the seam allowance over the template.

IMG_2083

IMG_2084

Ok, once I prepped the pink section, I removed the freezer paper template and cut the first section off.  I am using this same template for all the pieces in this section, just like I did in my last post.

IMG_2085

Next, I prepped the yellow section (Y1).

IMG_2086

I traced the 4 leaf shapes onto the yellow fabric and then glued the yellow section on top of the pink section.

IMG_2101

Next, I prepped the 4 leaf shapes, but, as you can see, I only prepped one side of the leaf, and left the other side a raw edge. I also drew the seam allowance on.  See how easy it is to line the pieces up?

IMG_2102

IMG_2103

Hang in there….we are almost finished!  I cut the next section from the freezer paper template and prepped it.

IMG_2090

First, I prepped the outside edge.

IMG_2091

Then I trimmed the middle section out and prepped it.

IMG_2092

I removed the freezer paper, which was not nearly as scary as you might think….
IMG_2093

…and voila!

IMG_2104

Slick!

IMG_2106

I am happy to report I have all 9 blocks of Trail Mix finished and stitched together.

IMG_0095

I still can’t believe how nicely everything matched up!

IMG_0093

IMG_0094

Til next time….

Kerry

Bed of Roses – Block 9

Block 9 already!  Where has the time gone?

Each time I start a new block of Sue Garman’s “Bed of Roses”, I am pleasantly surprised at how easy they are.  I encourage all appliquers (especially beginner appliquers) to give these blocks a try.  Block 9 (along with all previous 8 blocks) are available on my website Simple Bird Studio.  You can choose to order just the patterns (some of them or all of them) or you can choose to do this quilt as a Block of the Month which includes the pattern and the same fabrics that I am using.

I started this block like all the others.  I traced the pattern onto the background with a Clover water soluble marker. This marker comes available with a thick tip or a thin tip.  For tracing onto the background, I prefer the thick tip because it is a lot easier to see!

DSCN7628

Next, I use a Clover 1/4″ bias maker to make the stems.  I glue the stems in place with Roxanne’s Glue Baste it.  The marker, the bias maker and the glue are all available on my website.

DSCN7629

So now let me show you how I make all those templates.  I must confess, I really hate tracing my templates by hand and I will avoid doing it whenever possible!  First, I photocopy the pattern onto freezer paper and then I iron that piece of freezer paper onto another one to make two layers of freezer paper.

DSCN7592

Whenever I have a unit that has many layers, I could make multiple copies of each unit so I have a separate template for each section (but you know me well enough by now to know I am not going to do that!)  Here is what I am going to do instead…

I leave the entire unit intact and prep the piece as I normally would.  Because I am making the outer section, I am using R3 fabric.

DSCN7593

I iron the template onto the back of the fabric…

DSCN7594

…and I cut it out leaving a 1/4″ seam allowance.  This piece has fairly gently curves, so I clip just once.  Notice I don’t clip all the way to the freezer paper.

DSCN7595

I prep the pieces using a stiletto, a mini iron and liquid starch.

DSCN7596

So, now it is time to remove the freezer paper.

DSCN7598

Now, I take that same template that I just removed, and cut the first section off.

DSCN7600

DSCN7601

Next, I am going to repeat everything I just did, except on a different fabric…

DSCN7604

DSCN7605

I should mention that there are two identical units on this block and I am making both at the same time using just this one template.

DSCN7606

I just keep cutting the outer section off and reusing the same template….

DSCN7607

DSCN7609

DSCN7610

DSCN7611

DSCN7612

DSCN7613

So here we have 10 separate sections I prepped using just one template.  Sweet!

DSCN7614

Here is another layering tip that I am happy to share with you.  It will make your life a whole lot easier!  When you place one piece on top of another, you need to leave that part of the seam allowance un-prepped.  I take my template and draw the seam allowance on with my marking pencil.

DSCN7615

DSCN7616

DSCN7619

When I place each piece on the background, the line I have drawn replaces the line on the background that I have just covered up.

DSCN7641

DSCN7643

DSCN7644

Voila!DSCN7645
Now its time to start adding the leaves……

DSCN7655

……and berries.  Lots of berries!

DSCN7660

And finally, a funky little vase!  Love it!!

DSCN7663

Til next time….

Kerry