So Close to a Finish!

This block in Sue Garman’s “Friends of Baltimore”  is so close to being complete!  I am so excited!!  The only thing left is the Album that will sit in the empty space.

First, I made the spine of the Album…

book 1

…and then I prepped the red background of the Album.  I chose more of a burgundy red so the Album would stand out from the red flowers.

book 2

The skinny beige border is a full piece.  I think it is easier to work with a big piece rather than a skinny little piece!  And finally, the top red piece of fabric.

book 3

I added the spine…

album

…and I placed the Album in the basket……

almost finished - Copy

…and I topped it off with a flower and some leaves.  Voila!!

officially finished 6

Can’t wait to start the next block!  I am pre-washing the fabrics as we speak!!

pre-washing next block

Til next time…

Kerry

One Flower at a Time!

It may be cold, but the sun is shining (!) and we are all basking in it!!

sunshine

I am slowly filling my vase one flower at a time.  I added a few buds and a tulip…

a few more flowers

…and more flowers and leaves.

continuing along

I love these roses!

roses (2)

So here is the vase full of flowers!  Time to start the Album that will fill that empty space!

getting there

Til next time…

Kerry

It’s the little things that amuse me!

Believe it or not, this is a freezer paper template!  Pretty tiny!

tiny piece 2 (2)

And this is the prepped piece.  Stop the madness!

tiny piece 2 (1)

Some of the pieces in the block are smaller than the scraps in my garbage container!

distracted

Here is where the itty bitty piece goes…

tiny piece 3

…and this is the rest of the flower!

tiny piece 4

It is a little slow-going, but it is starting to look like I am accomplishing something!

getting there

I have not done much hand-quilting since before the holidays.  It is time to get hand-quilting again!  Bruin joins me every evening as I sit and stitch the (very chilly) evening away!

bruin on couch

Til next time….

Kerry

Slowly filling the vase.

Believe it or not, I am working pretty steady on this block from Sue Garman’s “Friends of Baltimore”.  First, I made a flower and some leaves.

1 (2)

And then I did it all over again!

2 (2)

Then came a few more leaves and a stem.  (Just between you and me, the leaf on top of the blue handle is supposed to be under the blue handle.  Mum’s the word!)

3 (2)

Finally! Some red berries!

4 (2)

Sometimes I trace the pattern onto the background fabric with a Clover wash-out marker.  I use this method when it is  a simple design, like this one.  And by “simple”, I mean it does not have a lot of pieces!

bird and leaves

The block I am currently working on is not complicated, there are just a lot(!) of pieces that must line up properly or the whole thing goes bad!  So for this block, I am using my light table.  Not only is it more accurate, I save tons of time not having to trace the design on the background fabric.

First I tape the pattern onto the light table.

light table

Next, I place a background square on top of the pattern.  I always cut my backgrounds a good 2″-3″ bigger to allow for shrinkage.  I mark my corners so that I can re-position my block when I remove it from the light box.  I like to glue a few pieces on the background fabric, then I stitch the pieces in place, so I do a lot of re-positioning!

corner marks

This rose was fun!  I like to build units off-block when I can.  I start with the very  “back” layer.

flower1

Then I add each layer…flower2

flower3

flower4

…until I have built a rose!!

flower5

And it goes right about here!

flower6

Til next time….

Kerry

Stitching on the doodads!

Once the blue vase was stitched in place, it was time to add the gold doodads.  ( doodad: something unspecified whose name is either forgotten or unknown).  But first I had to choose the gold fabric.  I loved the pattern on this one, but it was just too light.

too light

And this one was too dark.  I guess I would classify this as dark brown/gold.

too dark

This one suited my fancy!!

just right

So I stitched on some doodads.

blue vase

And then some circles.  2

The handles were sort of tricky…

6

Spiffy!

7

Next came the vines and leaves….

8

And a few berries!9

It is time to start hand-quilting again.  I took a break through the holidays and Bruin was delighted!

bruin on my quilt

Til next time…

Kerry

Itching to stitch!

I love New Year’s Day!  The tree is down.  The decorations have been packed away for another year.  And now it’s time to get the sewing machine out of hiding!  I spent most of New Year’s Day cutting out blocks from Barbara Brackman’s Grandmother’s Choice.

Here is #18.

grandmothers choice 1

And here is #15.

grandmothers choice 2

And, finally, #11.

grandmothers choice 3

I finished stitching the first block of a quilt I am designing for my Sunday Afternoon Applique Group.

batik block

Here is the paper pattern.  Bruin likes to chew on my paper patterns.  See him in action here.  (Actually, seeing that post made me realize I have a few UFO’s that need to be finished this year!!  Yikes!!)  My thoughts are still percolating over the curvy inner border…and which setting I will use…and how many blocks to make…and how big will the quilt be…and so on and so on!  Designing a quilt is definitely about the journey!

paper pattern

I have been just itching to start the next block of Sue Garman’s “Friends of Baltimore”.  I decided the vase would be a perfect place to start.

First I stitched down the light blue section.

light blue

Next I stitched the dark blue section on top.  You can see that the light blue section is just a skinny edging, but I used a full piece of fabric to give it more stability.

vase 2 (2)

Then I added a few more pieces.

vase 3

vase 4

And finally, an almost finished vase!

vase 5

Till next time…

Kerry

A Mathematical Miracle!!

My Challenge was to have a complete row stitched together by December 31.  Well! It’s only December 29 and I have met my Challenge!  First I stitched a couple of blocks together.

2 blocks

Then I added another block…

3 blocks

…and another one.  Finally, the row was finished.  And to top it off, I added a side border!  Jenny is thrilled!

jenny and blocks

Some people asked me why I pressed my seams open for my half-square triangles.  Here is the reason:  When I stitch and press all my seams open, I have a ready-made guide for my seam line.

seam allowance

I don’t exactly know why this works, but I consider it a Mathematical Miracle!!

Til next time….

Kerry

Half Square Triangles 101

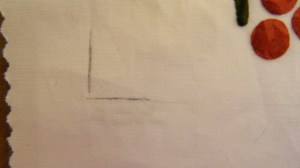
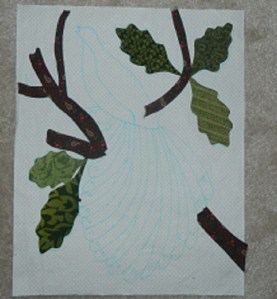
Oddly enough, I found myself with a spare couple of hours on Christmas day…with not much to do!  So I decided to start cutting and sewing together the 967 (are you kidding?) half-square triangles needed for the sashings and borders for my “Friends of Baltimore”.

Here is my method for cutting half-square triangles.  Beware!  It is time-consuming but extremely accurate.

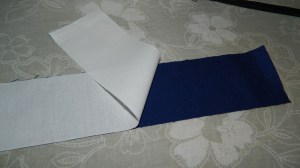
First of all, I always cut my triangles bigger than what is called for in the pattern.  In this case, the pattern called for 1 7/8″ squares to be cut.  I wanted to cut the squares 2 1/4″, so I needed to cut my strips 2 1/4″ wide.  To make the stitching go quicker, I layered a blue and a white strip on the cutting mat…

2 strips together

…then I cut my squares 2 1/4″.

cut 2 and a quarter

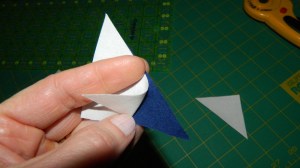
Next, I cut all my squares on the diagonal to make lots and lots of triangles.

bunch of triangles

Now I just pick up a set of triangles and stitch away!!

ready to stitch

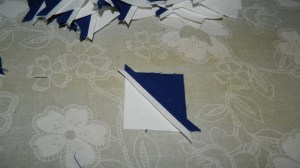
Once they are stitched together, I pressed the seam open.

press seams open

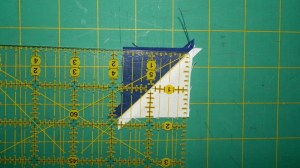
Now it’s time to trim the HST down to 1 1/2″ square.  I place the HST on the cutting mat with the seam line running from the bottom left hand corner to the top right hand corner.

HST

Then I line up the diagonal line on the ruler with the diagonal line of the seam.  All I want to do right now is to square up the top right-hand corner.

trim 1

trim 2

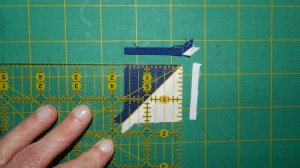
Next, I flip the HST triangle around and line up the diagonal line of the ruler with the seam.  But…this time, I am lining up the edge that I just squared up with the 1 1/2″ lines on the ruler….

trim

..and trim it to the perfect size!

trim 4

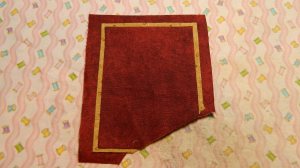
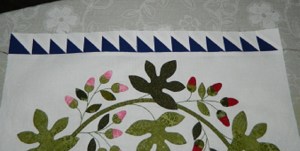
The sashing consist of 15 half-square triangles stitched together.  And they have to measure exactly 15 1/2″ long, (the blocks measure 15 1/2 unfinished) so an accurate seam allowance is very important.  I did a test and realized my seam allowance could be tiny bit bigger, because the sashing  was too long.

test 1

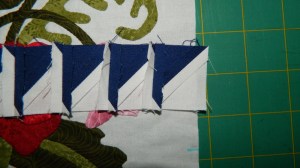
I re-stitched a few of the seams and voila!  It fits!

test 3

Til next time…

Kerry

Sunday afternoon stitching…

My Christmas baking is finally done!

christmas baking

So that means I have more time for important stuff…like stitching!

My Sunday Afternoon Applique Group met today.  We all agreed we should have been shopping/baking/wrapping, but it was sure nice to sit and stitch (and relax!) for a couple of hours with a great group of ladies!   I decided to work on the tail feathers of my Civil War Bride block.  Long, skinny pieces can be tricky to stitch.  Here are a few tips:

Remember, there is no need to fold the seam allowance over if it is going to be covered with another piece.  Leave it “raw”.

raw edge

Begin stitching here…

start here

…and end here.end here

When I am finished stitching the piece in place, I  baste along the raw edge, just inside the seam allowance.

basting

So when I put the next feather in place, the piece I am covering lays nice and flat.

next one 2

I still have a few feathers to stitch!

tail feathers (2)

I have chosen the fabric for the half-square triangle sashing for my Friends of Baltimore quilt.   The fabric is not royal blue or navy blue…just somewhere in between!  I am going to start to sew the half-square triangles together, and maybe start to stitch the finished blocks together!  So exciting!

blue fabric

Til next time….

Kerry

Spare time??

This time of year, spare time is a rare commodity.   But I still managed to find the time to finish this block from Sue Garman’s “Friends of Baltimore”.

finished block

And here is a close up.

detail

My Sunday Afternoon Group meets the third Sunday of every month so that means we meet this Sunday….already!  Every year we begin a new project so I offered to design next year’s quilt.  Here is a preview of the first block.  They haven’t seen it yet, so mum’s the word!

sneak peak

I am taking the plunge and using my collection of batiks.  (I’ve never really used batiks but somehow I ended up with an amazing batik collection!!)  So far, I love them!  The colours are so vibrant and saturated.   The best part is the fabric does not fray.  I am now an OFB… Official Fan of Batiks!

I pre-washed every last one of them…

DSCN2316

…and Bruin found yet another (!) cat bed!

bruin and fabric

I have started the next block of The Civil War Bride.  First, I stitched some branches and some leaves..

block 4

I used every inch of the branch fabric!

every inch of fabric

The tail feathers have me very intrigued!  They seem to fit together like a puzzle.  I love puzzles!

tail feathers

And here are the tail feathers just waiting to be stitched!

prepped tailfeathers

Til next time…

Kerry