Always more than one option….

It occurs to me from time to time that quilting is a lot like life.  You rarely are in a situation where you do not have options.  And the option you choose is really up to you (and not the Quilt Police!).  There are a few dainty buds in the border of Sue Garman’s “Friends of Baltimore”.  How you decide to make them is totally up to you!

Here are the buds……they are the same but I am going to prep them two different ways.

DSCN5655

First, I ironed both buds to the wrong side of the fabric and cut them out.

DSCN5656

For the first bud, I prepped it in my normal way.

DSCN5657

Next, I removed the freezer paper and cut out the circle to use as a pattern for the red centre and prepped it.

DSCN5658

DSCN5660

Bud #1.

DSCN5661

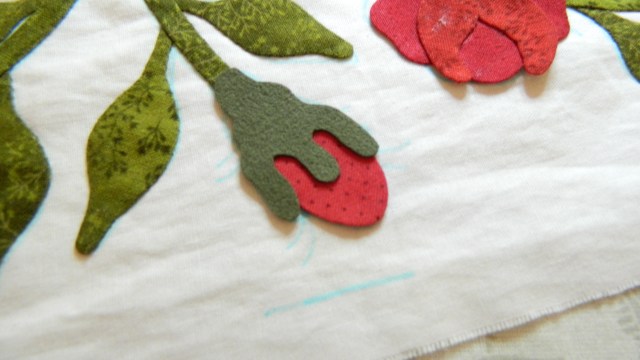
For Bud # 2, I decided to do reverse applique.  I think this term often confuses people. (You are not appliqueing in reverse!) You are simply reversing the layers.  For Bud #1, I placed the red piece on top of the green piece.  Bud #2 involves placing the green piece on top of the red piece.

This technique involves cutting a hole in the centre of the fabric and still leave a seam allowance that you can turn.

DSCN5662

I carefull clipped the seam allowance.  You can see that I didn’t clip right up to the freezer paper.  And you can see how small the hole is!

DSCN5663

Then I carefully turned the inner edge.

DSCN5664

And once the outer edge was prepped, I removed the freezer paper.

DSCN5667


DSCN5665

And finally, I cut a piece of red to place under the bud.  There is no need to prep the edges of the red piece of fabric.  It will be covered up.

DSCN5666

So here are both buds glued in placed in the border.  Remember, you always have options!!

DSCN5671

In my spare time I am still making hexies…and still loving it!!

DSCN5676

Til next time…

Kerry


Prepping and prepping…..

I have been spending most of my spare time prepping the second border of Sue Garman’s “Friends of Baltimore”.  I must admit, it is a little tedious, however, I am sticking with it!!   It isn’t long before this…

DSCN5639

…and this…

DSCN5641

….becomes this!  For those people who have asked how I prep my pieces, you can see more here.

DSCN5642

Once the pieces are prepped, I use a dab of glue and attach them to the paper pattern.  I do this for a  few reasons…one is so I can make sure I prep all of the pieces and don’t forget any.  The second reason is so I do not lose any pieces (been there, done that!).  And I can preview my fabrics, which is especially useful when doing multi-couloured flowers.

DSCN5643

Once I get a section prepped, I am eager to glue it to the background and then I stitch it in place.  I find it easier to break the process down into smaller chunks rather than to try to do the prepping all at once, then all of the stitching at once.  That is just the way I work!

DSCN5644

Yes, I have been hexi-ing!  I have a special project in mind!

DSCN5652

And finally, I am in the process of turning the last(!) corner of Circle of Tulips.  So exciting!

DSCN5651

Speaking of excitement…my Civil War Bride Quilt received a ribbon at the Plowing Match Quilt Competition!  All quilts that received a ribbon will be exhibited in the Lifestyles Area at the 2014 Simcoe County International Plowing Match and Rural Expo September 16-20, 2014.  Sweet!

ribbon

Til next time….

Kerry


Back to the border…

Once I had the second border of Sue Garman’s “Friend’s of Baltimore” traced, I was raring to go!  (I really don’t like tracing, so I will put it off as long as possible.)

When I am filling a vase with flowers, I like to prep the pieces and place them onto my paper pattern before I glue them to the bacground fabric.  That way I can tweek anything that looks out of place.

DSCN5622

First, I added a few stems and buds.  But then I realized, I couldn’t go much further until the vase was in place.  (A few of the flowers and leaves overlapped the vase.)

DSCN5624

So I started to build the vase.  The edges of this piece will be totally covered by more pieces…keep watching!

DSCN5626

Then I added the base.

DSCN5627

Next came the second layer of the vase.

DSCN5628

DSCN5629

…and finally, the very last piece of the vase!

DSCN5630

Well, except for all those circles!  Sweet!

DSCN5636

Some of you have asked me if the patterns for “To Everything There Is A Season” are available for download only or can I mail them out.  Yes, I can mail you a paper pattern instead of emailing you a link.  I have added this option to my website.  The cost is $10.00 and includes a color picture of the block and shipping anywhere in Canada or the U.S.  To have the patterns shipped to other countries, please contact me.

Til next time…

Kerry

Put the hexies down and walk away!!

Even though I am OHOH (Officially Hooked On Hexies), I still have some projects that are needing my attention.  As of this moment, I have 3 (how did that happen?) hexie projects on the go.  First, my brown-ish-neutralish kind of scrappy collection.

DSCN5617

Then, there is my bright-cutesy could be a baby quilt collection.

DSCN5609

And last, but certainly not least, it the first block of a Hexie Quilt Along (Value Proposition Quilt Along) that I found on an amazing blog by Karen at Faeries and Fibres.  If you want to know anything about hexies (I mean anything!) and English paper piecing in general, this is a blog you must visit!  But make yourself a cup of tea first, you may be there a while!

DSCN5614

Last night, I took the time to trace the second border of  Sue Garman’s Friends of Baltimore.  I would really (I mean, really!) like to have this quilt finished by the end of this year.  You know, one more thing to cross off the bucket list!   Yikes!  Do I see ferns??

DSCN5608

I thought I would show how I assembled the hummingbird block, the latest block of “To Everything There Is A Season”.  Looks complicated, but really it isn’t!

First, I traced the pattern on to my background.  Next, I added the leaves and the blue flowers.

DSCN5553

Now, I have a dilemma…the leaves have covered up some of the traced lines, and I cannot see where to put the flower petals.  Here is my solution.  I “build” the flowers on an applique pressing sheet.

DSCN5554

Then I pick the flower up in one piece and glue it in place.  Easy peasy!

DSCN5557

Here is how I stitched the hummingbird.  Don’t forget that the “underneath” wing goes on the background before the feathers. I forgot,  so I had to un-stitch the feathers and insert the wing underneath.

DSCN5583

Next, the head, the underbody and the tail feathers…

DSCN5584

DSCN5594

…and the top body and a beak.  He just needs an eye!

DSCN5596

Til next time….

Kerry


First Border On!

Last Wednesday evening I finished stitching all I could on the first border of Sue Garman’s “Friends of Baltimore”.  I filled the sink with hot soapy water and let the border soak for a while.  I use hot water because I think the glue and starch soften quicker in hot water…maybe it does, maybe it doesn’t, but that is just what I do!  Next, I like to use Soak in the water, but if I don’t have any Soak on hand, I use dish soap.

DSCN5450

I normally let it soak for an hour or two.  When I went to take the border out of the water, I was mildly shocked to see that most of the red fabrics had run into the white background.  After doing a quick bit of research online, I jumped in the car and went shopping for some Oxy-Clean and some color magnet sheets.  Luckily, I found them, came home and threw the border into the washing machine with both products.  I am happy (and sooooo relieved) to tell you the border came out of the washing machine without a speck of red dye on it.  Thank you, Quilting Gods!

The following day, I laid the border out on a towel and let it dry.  Once it was dry, I placed the border  onto the pattern and marked the cutting lines with a water soluble marker.  I always cut my background pieces  larger than the pattern calls for, so they need to trimmed to the correct size.

DSCN5459

Next, I stitched the border on.

DSCN5460

When I went to press the seam flat, I noticed that some of the navy blue fabric had frayed, and it was sticking out past the seam allowance.  I very carefully trimmed off the navy blue bits.  I mean….very, very carefully!

DSCN5461

DSCN5462

So here we are!

DSCN5465

I promised myself once I had the first border stitched on, I would start the next block of Ladies of the Sea, another Sue Garman pattern.  The ship on this block is called The Xebec Pirate Ship.  It looks very interesting with that skull and crossbones!  I used a gradient fabric for the bias stems.DSCN5454

If you look closely, you will see  the color goes from light to dark green.  Fun!

DSCN5456

DSCN5458

One day (when I have time!) I am going to do some research on cats and quilts.  I had not seen Bruin all morning.  I placed my quilt on the floor so I could take a picture of it. I went to find my camera and this is what I returned to find.  Sheesh!

DSCN5469

Til next time…

Kerry

Surrounded by talent!

Our Sunday Afternoon Applique Group met yesterday and wait til you see the Show and Tell!  This is Christie’s version of Aunt Millie’s Garden.  Spectacular! This materpiece was machine quilted by Carl of Lilac Lanes in Alliston.  This is the fourth (!) Aunt Millie’s Garden  to come out of this group…and we are patiently waithing for one more…stitch, Kathy, stitch!!

christie's quilt

block2

abd block

Next, we have Lynn’s “Woodland Creatures” a quilt designed by Rosemary Makhan, who sadly passed away recently.  The more we looked at the quilt, the more detail we found!  This masterpiece was machine quilted by Ruth at Stitching Impressions.

WOODLAND CREATURES

SPIDER WEB

SNAKE

PINK FLOWER

I spent most of Saturday working on my border of Sue Garman’s “Friends of Baltimore”.

DSCN5412

DSCN5414

DSCN5415

Before I know it I will be finished!!

DSCN5417

Til next time…

Kerry

It’s all about the details!

It’s all about the details!  That is what I learned in Sandra Leichner’s class when I attended TESAA last month.  This is the block we worked on in class.

DSCN5400

Sandra’s quilts have an almost life-like quality to them, thanks to the incredible details, which include embroidery with just a single strand of thread around berries, fabric paint and choosing the perfect fabrics.  You can see Sandra’s beautiful quilts here.

I like to use Ultra-Suede for really small, intricate shapes, like  calyxes. I purchased some packages of Ultra-Suede from Faye Labanaris, one of the wonderful merchants at TESAA.  Check out her website here.  If you have any question at all in regard to using Ultra-Suede, make sure you take the time to watch her video. It may just be the best 10 minutes of your day!!  Of course, I would have liked one of everything she had for sale, however, I played it safe and chose a green package and a gold package.  Each piece measures about 3″ x 6″.  As you can see, you get a lovely assortment in each package.

DSCN5405

When using Ultra-Suede,  simply cut out around the shape (no seam allowance is necessary).  I stitch it in place using the same applique stitch I use for “normal applique”.  Don’t tug your stitches too tight or you will end up with “dimples” around the edge.

I started to think about what I learned in Sandra’s class and thought I might try embroidering around the calyx, just to give it a more “finished” look.  So, I used just one strand of embroidery floss close to the same colour as the Ultra-Suede.

This is a picture when the Ultra-Suede is just glued in place.

DSCN5394

This is it after it is stitched with thread.

DSCN5395

And, after the embroidery.  See?  It really is about the details!!

DSCN5396

As you can see, I have been plugging away at the border of Friends of Baltimore.  I am working on one side of the border at a time, just to make the stitching a little more manageable.

DSCN5397

And, I am working away (slowly, but surely) on Rita’s block.  I have an awesome plan for this block!

DSCN5401

Til next time…

Kerry

Filling a Vase One Flower At A Time

The first border of Sue Garman’s “Friends of Baltimore” is not nearly as daunting as I thought it would be.  No really!  If you take a good look at the pieces, you will see that most of them are very simple shapes and easy to do.  There is just lots of them!!

I have most of the leaves prepped and glued onto my paper pattern.  This is proving to be a really effecient method because I have not lost a single piece!  DSCN5169

Once a few of the leaves were in place, I started to add the buds and flowers.

DSCN5173

DSCN5174

DSCN5176

These flowers are so dainty and super-simple.  I love them!

DSCN5183

Now, it’s time to add the teensy, tiny yellow centre.

DSCN5186

DSCN5188

Very dainty!

DSCN5190

So, now it’s just a matter of adding each flower…one at a time…until you have a vase full of lovely flowers!

DSCN5181

DSCN5191

DSCN5198

I am now going to make a pot of tea.  I have lots of stitching to do!

DSCN5199

Til next time….

Kerry

A Good Way to End the Year!

Yesterday was one of those days I dream of.  I had the entire house to myself for the whole day!!  Sure, I could have done lots of things, but I really wanted to end this year with a bang.  I desperately wanted to finish putting all 16 blocks of Sue Garman’s “Friends of Baltimore” together, complete with all of those half-square triangles.  So that is what I did!

First, I finished sewing all  of the triangles together and then trimmed them to the correct size.  You can read more about that here.  It is a lot of work, but so worth it!  Next, I stitched them together to make one long strip….

1

….crossed my fingers and started stitching.

2

So far, so good!

3

I did the exact same thing for the other side.

4

I thought I deserved a break, so I made a pot of tea, grabbed my Ipod and listened to some tunes in the hot-tub.  (Remember…I had the day to myself!!)6

When I came back in, I was raring to go, but my seat was occupied.  Didn’t matter, I was pumped!

4a

Finally!  After many, many hours, all 16 blocks stitched together!

7

Cue the fireworks!

happy-new-year-fireworks-12694

Til next year…

Kerry

Moving Right Along!

I was very excited to start working on this block.  First, I started on the right side of the wreath with a few flowers, leaves and buds.

DSCN4974

DSCN4977

Next, I added the left side.

DSCN4978

And, finally, the bluebird!

DSCN4982

DSCN4983

I have been steadily hand-quilting on Circle of Tupils.  I am pleased because it has that antique look I was going for.  I love it when a plan comes together!   The stencil that I have chosen for the border has me intrigued, so I am anxious to start it!

DSCN4985

DSCN4734

Til next time…..

Kerry