It’s all about the details!

It’s all about the details!  That is what I learned in Sandra Leichner’s class when I attended TESAA last month.  This is the block we worked on in class.

DSCN5400

Sandra’s quilts have an almost life-like quality to them, thanks to the incredible details, which include embroidery with just a single strand of thread around berries, fabric paint and choosing the perfect fabrics.  You can see Sandra’s beautiful quilts here.

I like to use Ultra-Suede for really small, intricate shapes, like  calyxes. I purchased some packages of Ultra-Suede from Faye Labanaris, one of the wonderful merchants at TESAA.  Check out her website here.  If you have any question at all in regard to using Ultra-Suede, make sure you take the time to watch her video. It may just be the best 10 minutes of your day!!  Of course, I would have liked one of everything she had for sale, however, I played it safe and chose a green package and a gold package.  Each piece measures about 3″ x 6″.  As you can see, you get a lovely assortment in each package.

DSCN5405

When using Ultra-Suede,  simply cut out around the shape (no seam allowance is necessary).  I stitch it in place using the same applique stitch I use for “normal applique”.  Don’t tug your stitches too tight or you will end up with “dimples” around the edge.

I started to think about what I learned in Sandra’s class and thought I might try embroidering around the calyx, just to give it a more “finished” look.  So, I used just one strand of embroidery floss close to the same colour as the Ultra-Suede.

This is a picture when the Ultra-Suede is just glued in place.

DSCN5394

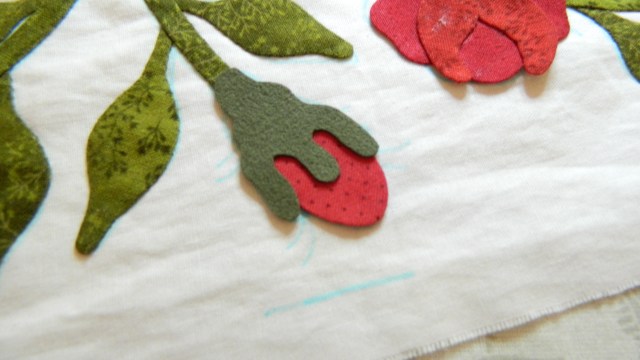
This is it after it is stitched with thread.

DSCN5395

And, after the embroidery.  See?  It really is about the details!!

DSCN5396

As you can see, I have been plugging away at the border of Friends of Baltimore.  I am working on one side of the border at a time, just to make the stitching a little more manageable.

DSCN5397

And, I am working away (slowly, but surely) on Rita’s block.  I have an awesome plan for this block!

DSCN5401

Til next time…

Kerry

Back from TESAA!

Where does the time go?  I have been back from The Elly Sienkiewicz Applique Academy for almost a week, and I am still overwhelmed.  It is so hard to get back to my normal routine!  I am happy to report that hand-applique is definitely alive and well.  I am actually going to go out on a limb and say that hand-applique must be on the upswing, judging by the amount of first time attendees at the Academy.

The first class I took was with Rita Verroca.  Not only is she super-talented and willing to share everything she knows, she is the one of the nicest people you will ever meet.  Check out those cowboy boots!

DSCN5349

DSCN5352

This is a quilt designed by Rita.  It is called Album of Roses.  As you can see, Rita has a unique style of choosing fabrics that make her quilts stunning and one-of-a-kind!  Yes…it is hand-quilted!!

DSCN5346

DSCN5343

This is a picture of the quilt block we were working on in class.  It is part of an ongoing series of blocks Rita is designing depicting early American history.

DSCN5347

This is what I have accomplished, so far.

DSCN5351

DSCN5354

DSCN5355

DSCN5358

There are some really teeny, tiny pieces in this block!

DSCN5357

Til next time…

Kerry

I know I should be packing…

It’s the day before I fly to Williamsburg to attend The Elly Sienkiewicz Applique Academy and I should be packed by now, but I am not.  I am too busy working out the rest of the border on Circle of Tulips and I want to get it figured out before I go….so I can relax!

So, in my last post I figured out how to center the swags and how to fill in the space between the swags.

My next step was to decide how curvy I wanted the scalloped edge to be. (Not terribly curvy, I thought, because I have to bind the curve.) So this is what I did…

I took a piece of upholstery vinyl and placed it on the already marked swag.  Next, I marked some placement lines with a Sharpie marker.  The vinyl is clear, but it really is there!

DSCN5333

Next, I drew a curved line 3 1/2″ away from the bottom edge of the swag.  Then I cut the upholstery vinyl on the curve, making sure that the Sharpie line was on the template, so I could see it.

DSCN5331

Now I can line up the template and draw a consistent curve…..with a water soluble marker…not a Sharpie!!

DSCN5339

My plan is to stop stitching at the drawn line, so that when I cut the excess fabric and batting off  I am not cutting through the stitching.

DSCN5342

Splendid!!  Now I really must go and pack!!

DSCN5340

DSCN5341

Til next time….

Kerry

So many blocks!

Finally!   Owen’s quilt top  finished.  Notice the stars in the border actually look like stars?  Yipee!  These 16 blocks came from last year’s Barbara Brackman’s block-of-the-week, Grandmother’s Choice.  I actually made 3 blocks every week, so let’s do the math…3 blocks for 52 weeks is 156 blocks…that’s a lot of blocks!  I see a few more quilts on the horizon made from the remaining blocks.

DSCN5324

I am busy getting the backing ready for Owen’s quilt so I can take it to Colleen at Elite Quilting before I leave on Sunday for TESAA.  3 more sleeps!!  I have appliqued something special on the back, but you will have to wait patiently until the quilt is back from Colleen’s to see it.  Just a hint…

DSCN5297

As I was standing in line at the grocery store, I finally figured out how to tackle the border on my Circle of Tulips quilt.  (I should mention that I am always thinking about quilting.  Every waking moment.)  I purchased a stencil a while back and wanted to use it on the borders.

DSCN4734

My only problem was that the stencil did not fit the length of the border evenly and I didn’t want to fudge it, like I fudged the border of  “Bouquet for a New Day”.  You can see that here.  So I had a bit of problem solving to do.  First, I thought about how I wanted the finished border to look like.  I wanted the swags to fit directly under each wreath of tulips, so I drew a line that extended from the seam into the border.  That gave me a visual idea of the space I had to work with.  I am using a Clover water soluble marker, so these marks will wash out!

DSCN5302

Next, I centred the swag between the lines.  As you can see, I have some space to fill.  Hmmmm…

DSCN5306

The heart in the stencil seemed to suit the space.  It was a tiny bit narrow, so I made a template to round out the design.  So far, so good!DSCN5307

DSCN5309

DSCN5308

Next, I decided that I would like some quilted lines to fill the space above and below the swags.  Since I am a sucker  for punishment, I spaced them 1/2″ apart.  I must admit, it looks smashing!

DSCN5314

So, before I mark the whole entire border, I am quilting a small section just to see if I like it.  What’s not to like??

DSCN5326

Here is the first block of Barbara Brackman’s new block-of-the-month, Threads of Memory.  I am using a line of fabrics designed by Jo Morton called Amelia.  Lovely!

DSCN5330

Til next time….

Kerry

Welcome to my bathroom…

Whenever I mention that I wash my finished applique blocks, I get emails with lots of really good questions.  So I decided to do a video showing the entire process.  You can see it here. Once you watch the video, the title of this post will make sense.  Trust me.

If you haven’t seen my website, check it out.  All of the tools and notions I use are available on my website.  I also offer a free pattern called “Peggy’s Puzzle”.  It is a 4-block wallhanging (or tabletopper), complete with a dainty border and was designed as a “skillbuilder” exclusively for Simple Bird Studio by MT Designs.  We have just uploaded the third block.  There are also accompanying how-to videos.

I have been hand-quilting every night on Circle of Tulips (also a free pattern on my website!).  One or two more evening and I will have all of the blocks completed and ready to move onto the borders.

DSCN5159

Yesterday, I went shopping for the backing for Owen’s quilt.  I had a few ideas of what I was looking for…something boyish, but not baby-ish, something masculine, but not too manly…oh….and it had to be in the same colour-family as the front of the quilt.  Well!  Look what I found!!  Is it wrong to fall in love with a fabric at first sight?  Well…I did!

DSCN5288

Like many quilters, I am trying to bust my stash.  And, as you can see, I used 3 different reds in the stars, which used up every bit of that lovely (but hard to match) brick red that I own.  So when I was shopping for the backing, I chose a few reds that I thought would match the yet-to-be-completed stars for the border.  This one is the winner!   Long story short, I added more brick red to my stash than I used in the quilt.  So much for stash busting!

DSCN5282

Til next time….

Kerry

A Bit of This and That!

It snowed all day.  Literally, all day.  Which meant I wasn’t going anywhere, except to my sewing room.  I decided to put a pot of chili on and play “catch-up” on a few on-going quilt projects.  First, I started making the sashing for Owen’s quilt.  By stitching 4 simple half-square triangles to the corners of each sashing and adding some cornerstones…

DSCN5240

…..this is what you get!  Magical!

DSCN5247

I must confess, I did not calculate for the half-square triangles for the red stars to continue out into the border.  Oops.  I’ll figure that out tomorrow.

DSCN5248

So, I put Owen’s quilt away and dug out Annabelle.  I finished stitching the leaves and the hexies, so, it was time for a bubble bath (for Annabelle, not for me!)

DSCN5236

While Annabelle was soaking, I decided to go through my fabrics to find a suitable fabric for the 4″ border. To keep myself organized, I am keeping all of the fabrics for Annabelle in a plastic tote (complete with lid) to keep Bruin out.  That plan will only work if I remember to place the lid on the tote!

DSCN5231

Anyway, I auditioned a few fabrics, but nothing caught my eye.  That is, until I saw the fabric I used for the vase.  Hmmmm…

DSCN5251

I thought that the stripes  would make a nifty border.  And the best part?  They were exactly the right size…4 1/2″ wide!  I think the Quilt Gods are trying to tell me something.  Maybe I should listen!
DSCN5255

DSCN5249

After I did some serious measuring, I realized I only had 3 stripes long enough  for the borders (28 1/2″).  The fourth stripe was too short….but that wasn’t going to stop me!

DSCN5259

I had a few smaller chunks of the stripe left over, so I thought I would try piecing it.  First, I ironed the edge over on the left over piece, about 1/2″ or so.

DSCN5261

Next, I placed it on the section that was too short and lined it up as best I could.

DSCN5263

I carefully folded it over, (so now the two border pieces are right sides together)  pinned it in place, held my breath and stitched on the folded line.

DSCN5264

I exhaled.  Then, I checked to make sure it matched (it did!).  I trimmed the seam allowance to 1/4″ away from the stitched line.  Finally, I trimmed the border to 28 1/2″.

DSCN5267

Once that drama was over, I stitched all four borders on and added some cornerstones!  Dandy!

DSCN5268

DSCN5275

Til next time…

Kerry

Filling a Vase One Flower At A Time

The first border of Sue Garman’s “Friends of Baltimore” is not nearly as daunting as I thought it would be.  No really!  If you take a good look at the pieces, you will see that most of them are very simple shapes and easy to do.  There is just lots of them!!

I have most of the leaves prepped and glued onto my paper pattern.  This is proving to be a really effecient method because I have not lost a single piece!  DSCN5169

Once a few of the leaves were in place, I started to add the buds and flowers.

DSCN5173

DSCN5174

DSCN5176

These flowers are so dainty and super-simple.  I love them!

DSCN5183

Now, it’s time to add the teensy, tiny yellow centre.

DSCN5186

DSCN5188

Very dainty!

DSCN5190

So, now it’s just a matter of adding each flower…one at a time…until you have a vase full of lovely flowers!

DSCN5181

DSCN5191

DSCN5198

I am now going to make a pot of tea.  I have lots of stitching to do!

DSCN5199

Til next time….

Kerry

Let’s Celebrate!!

I love it when a plan comes together!  In my last post I explained how I was trying really hard to stay organized, which is actually very difficult for me.  But my plan is working better than I hoped it would and I want to share it with you!

As I prep each piece, I glue it onto a copy of the paper pattern.

DSCN5111

I started out pinning each piece in place but soon realized I was going to run out of pins, and, more importantly, the pattern was pinned to the ironing board and I couldn’t move it.  So I started to use a glue stick and, now, life is good!  I can now move the pattern!

So, once I have enough pieces prepped to complete a section, I am ready to transfer the pieces to the background.  In reality, I could wait until the whole entire border is prepped before glueing the pieces onto the background, but I can’t wait that long!

So, I unstick the pattern piece from the pattern.  This is the point that I remove the freezer paper template.  By leaving in it, I can identify it (each piece has its own number…sort of like a paint by number picture).  The other reason I leave it in is just to keep it stable.

DSCN5123

I add a few dots of glue…

DSCN5124

….and then pop it in place.  Then I added a few more leaves and a bias stem….

DSCN5128

…and a few more leaves and another bias stem…and Voila!  Easy peasy!

DSCN5130

This pattern piece scares me.  There is very little seam allowance in between the leaf and the stem.

DSCN5144

Let me show you how I really feel.  scared-lady

So this is what I do.  I take my magic wand and…oh… I am pulling your leg!  I take my pencil and just draw a simple line.

DSCN5145

Now I can cut out the templates. And now I have two very manageable shapes to prep.  I did the same thing with a horse’s  leg.  Check it out here.

DSCN5146

DSCN5151

DSCN5153

Now I am very happy and I want to tell everyone how easy it is!

image of woaman on phone

And then celebrate!!

th

Til next time…..

Kerry

Focused and Organized

After a week of procrastinating, I have finally started the first border of Sue Garman’s “Friends of Baltimore” on Saturday.  I traced the whole pattern onto my background, which did not take nearly as long as I anticipated.  I like to use a Clover water-soluble marker when I trace my backgrounds.  The markers come in two sizes…thick tip and thin tip.  I always use the thick tip.  The line is thicker (of course!) and much easier to see!

20140118_194343

Next, I made a whole pile of leaves.  Lots and lots of leaves.  The leaves get stitched in place first, and then the bias stem is placed on top of the leaves, so I need to make all of the leaves first .  I am trying my darndest to stay focused and organized all at the same time.

20140118_185455

20140118_194028

As you can see, each leaf has it’s own number.  And they are actually backwards because when I print my patterns onto the freezer paper, I reverse the pattern.  So…I take each leaf and match it up with the corresponding leaf on the paper pattern.  A little time consuming, so when I have enough leaves to complete a vine, I yell “Bingo!”  It helps to pass the time.

DSCN5111

Once the first set of leaves was complete, I  started working on the center vase.  First, I did the cute little curly-cues.  And then the rest of the vase.

20140119_192821

20140119_204418

Annabelle is coming along quite nicely.  The hexies are mighty small and I am fussy cutting the fabric, so it is taking a bit of time!  I love how the hexies gives just a burst of something a little different!

DSCN5108

Til next time….

Kerry

So….I went shopping!

This is Annabelle…so far.

20140109_150806

I have been working on Annabelle between other projects.  The pieces are huge compared to anything else I am working on, so it’s a nice break.

DSCN5106

It has an appliqued centre, surrounded by applique borders.  I have chosen to use mainly browns, rusts and golds.  At some point, I have to add some dainty hexie-flowers that are in the borders, as well as the centre.

DSCN5103

Each time I made these little hexie flowers out of brown, they just weren’t dainty enough.  So….I looked at my focus fabric, and saw this colour, (circled in red) which I can only describe as “not exactly grey…not exactly blue”.  I think little hexie flowers in this colour would look lovely!

DSCN4929

I don’t think I have any fabric this colour.  Even if I do have some, I wouldn’t know where to begin looking for it, so it might be quicker just to go fabric shopping!  So, I went shopping and I found exactly what I was looking for!!  Dainty!

20140109_150750

Of course, I found a few more pieces to add to the mix!

20140109_151101

Also, I am slowly, but surely making progress on “Circle of Tulips”.

20140109_092928

This is a little something I am also working on.  Sometimes I like to sit at my sewing machine and not applique!   I have a large stack of blocks from Barbara Brackman’s “Grandmother’s Choice” Block-of-the-week and it’s time to do something with them.  Barbara has a new Block-of-the Month starting soon, called “Threads of Memory”.   Check it out here.  I made 3 blocks every week, (instead of 1) so I have lots of blocks!  The 16 blocks I chose varied in size a little, so I added corner triangles to all 4 sides of the blocks.

DSCN5081

DSCN5087

Then I was able to trim them all down to a consistent size (12 1/2″).

DSCN5088

This is what I have done so far.  I am making this quilt for Owen, a little boy who has a place in a lot of  hearts.  Owen is just a little over 1 year old so he is still in a crib.  But one day he will be moving to a big boy bed and he will need a quilt.

DSCN5090

Til next time……..

Kerry