Oh…to be organized! Take 2!

Just like  my scissors, my last post seemed to disappear into thin air!!  Here it is again…

Ask anyone who knows me and they will tell you that I am far from organized.  (organized: functioning within a formal structure, as in the coordination and direction of activities).  Being organized does not come easy for me.  (I would like to think that is a sign of a highly creative mind!)

Take, for instance, my Dilemna-of-the-Week.   My beloved Gingher embroidery scissors went missing.  They seemed to have vanished into thin air.  I checked all the obvious  places, but they were gone!  I asked my family members if they had seen my scissors.  Picture lots of eye rolling.  No one had seen my scissors and no one seemed concerned that my stuff was disappearing into thin air!

Then I remembered gathering up a load of fabrics and throwing them into the washer to be pre-washed.  I must have gathered up my scissors also, because that is indeed where they were found!

prewash 1 (3)

So when I start a block that has many, many pieces in it,  like this one,  this  is what I do to stay organized…

When I cut out my pattern, I keep it in sections, like bunches of leaves or whole flowers.   I prep one section at a time.

cut out 1

cut out 2

Next, I place a  copy of the pattern on my plywood-styrofoam thingy.  It is actually a sub-floor that I bought at Home Depot for $5.85.  It is particle board on one side and styrofoam on the other side.  It measures 24 inches square.

board 1

board 2

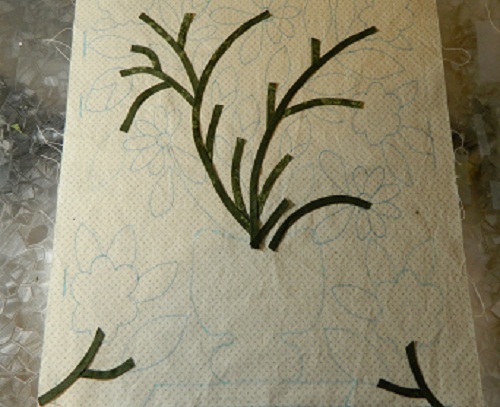
Once my pieces are prepped…

prep 1

…I pin them in place.

prep 2

Now I know exactly where they are!  How is that or being organized?

Til next time….

Kerry

Getting Ready to Start

I am eager to start the next block of Sue Garman’s “Friends of Baltimore”.  But, before I can start cutting and stitching, there are a few things that need to be done. First, I pre-washed the fabrics for the block, including the background, in Synthrapol.  This stops the colours from running.

prewash 2 (2)

So, while the fabrics were soaking, I decided to start making my freezer paper templates.  I took a good look at the pattern.  I only had one thought:  that is a whole lot of templates, and a whole lot of tracing!  (Between you and I, tracing is the part I dislike the most!)  So this is how I avoid tracing…

This particular pattern is larger than an 8 1/2″ x 11″ sheet of paper, so it has been divided in four parts.

2

I scan each individual sheet and import the images to my computer.

4

Next I open up Adobe Illustrator…

1

…and I scroll down and click on PLACE.

5

The image then pops up on the screen like magic!

6

This is the really cool part!  I hit REFLECT and the image….well, it reflects!  (If you use the needleturn method and trace your patterns on the right side of fabric, you do not need to reflect the pattern.)

7

You know you have done this properly if the writing on the pattern is backwards!  I place a piece of freezer paper in the printer, click on print…

8

…. and voila!

9

Now, I am going to make one big pattern out of the 4 sections.  I trim the patterns on the dotted lines.

10

I like my freezer paper templates to be double thickness.  So, I iron each section to a big piece of freezer paper and match all the dotted lines…like I am wallpapering…only better!

11

12

Now I get to cut out every one of those itty bitty pieces!

13

Here is a little something I want to share!

I use my light box all the time.  I love it…because I don’t have to trace the pattern on the background fabric.  Do you see a theme here?  Sometimes when there are multiple layers, it is hard to see what is underneath the pieces I have already glued in place. By gluing the leaves in place, I have covered up the flower that will sit on top of the leaves.  Confusing!   So here is what I do to make life easier.

hummingbird 1

I use my applique pressing sheet and build the flower on it, rather than on the block.  This is also called “off-block construction”.

hb2

I put just a dab of glue on each petal, and slowly add each piece, until I have a flower.

hb6

I very carefully lift the flower off the applique pressing sheet…

hb7

…and place it on the background.  Easy Peasy!

hb8

Til next time…

Kerry

A Productive Day!

It is not very often that I sit at my sewing machine and stitch the day away, but that is what I did yesterday!  I cut out and stitched…get ready….12 blocks from Grandmother’s Choice Block of the Week!  My plan is to make 3 quilts using these 8″ blocks, so I am stitching 3 variations of the same block.  I love to see how different fabric placement can drastically change the look of the block.  Here are the blocks:

This block is called “I Am An Anti”.  Honestly, I did not fussy cut the pink squares on purpose.  It just happened!

DSCN3595

Next on the runway is “Carrie Nation”.

DSCN3596

Followed by “Mr. Roosevelt’s Necktie”.

DSCN3597

And, last but not least, is “Jack’s Delight”.

DSCN3598

Jenny and Bruin like to keep me company when I sew.  They are kind of  famous!  Check out their youtube video here.

bruin

jenny and bruin

This is my latest finished block from “Bouquets For a New Day”. 5 more blocks to go!

bfand 1

The navy blue fabric in the vase is left over from an Irish Chain quilt I made for my Mom.

irish chain

Most of this block from “Civil War Bride” is stitched in place.  I started to think that maybe the table that the vase is sitting on is too dark for the overall look of the block.  So I cut out another table piece and auditioned it.  I do like it better.

cwb 1 (2)

My #1 rule in applique (and life) is this….fix something while it’s in the block stage, rather than finish the whole quilt and kick yourself because you were too busy…or too tired…or too lazy to fix it!  I have been guilty of all 3!

Til next time…

Kerry

Stitching the Night Away

Most evenings you will find me on the couch, hand-quilting the night away.  Once my needle hits the fabric, all the stress and tension of the day just seems to melt away.  Here is the latest block of Sue Garman’s “Bouquets For A New Day”.  So, now  I have 6 blocks quilted, and 6 more to go…oh… and a border.  (Heavy Sigh)

hand quilting

I have started working on the next block of Civil War Bride.  It can be tricky to figure out what order to place the stems on the background.  If the raw edge of “Stem A” is going to be covered with “Stem B”, then “Stem A” needs to be glued in place first.  (It’s easier than it sounds!!)

First, I put a few dabs of glue along the traced line, rather than putting glue on the actual stems. This will be “Stem A”. You can see that this stem will be covered by another stem.

cwb 3

Next, I carefully placed the stem on the line.  Because the stems are cut on the bias, they are easy to curve along the line.

cwb 4

Then,  I used the line that the next bias strip will be placed on as a guide to trim the stem to the correct length.  I have added a few dabs of glue to hold the next stem in place.

cwb 5

Now, another stem is in place….This is also a “Stem A”.

DSCN3521

And, finally, the longer stem that covers these shorter stems is glued in place.  This is “Stem B”.

cwb 6

So…here are a bunch of “Stem A’s”, waiting to be covered by one long “Stem B”.

glue

large stem

And, finally…all the stems are in place!

all stems in place

I thought this block needed a really special vase!   So I fussy-cut this fabric…

fabric 1

…and ended up with this vase!  Spiffy!

vase 4

Next, I added some buds….

buds

…and leaves and flowers!

buds leaves and flowers

Til next time…

Kerry

A Good Way to Spend the Evening!

It was going to be a very exciting evening!  I have completed another four  blocks from Sue Garman’s “Friend’s of Baltimore” and they are ready to be stitched together into a row.  I already have one row stitched together.  You can read about that here.  When I cut my background blocks, I always cut them 2″ or 3″ larger than the finished size.  So, before I could stitch the blocks together, I had to trim them down to the correct size.  Here is what I did to make the job so easy and stress-free…The best part is, I never had to measure anything!

I made a window template  with the opening the exact measurement of the unfinished size of the block.  The finished size is 15″, so I needed to trim the blocks down to 15 1/2″, therefore I made the opening 15 1/2″.  (I hope that makes sense!)

trim 2 (1)

So now I could place the window template on the block and make sure that everything was centred nicely.

trim 4 (2)

Next, I traced around the opening with a marking pen.

trim 7

Then I trimmed the excess fabric away by cutting on the marked line.  Easy peasy!

trim 5

trim 6

So, once I trimmed all the blocks to the correct size, I started to stitch the blocks together in a row.

r rows (2)

Ta da!   An evening well spent!

r rows (1)

Til next time…

Kerry

Finish a block…start a block!

Darn it!  Does this ever happen to you?  I was stitching merrily along, when I thought my stitches felt a little weird.  Then I noticed my background had folded over on itself and I was stitching through two layers.  I keep my stitch ripper handy for occasions just like this!

stitch 2

So, once the block was finally finished, I did what I do to all my finished blocks….I gave it a bath!  I like to wash everything out of my block…like glue, starch and anything else that shouldn’t be there!  First, I fill the sink with very hot water and a bit of soap.

sink 1

Next, I take a very deep breath…and then I toss my block into the water.

sink 3

I usually let it soak for a couple of hours.  Then I let the water out of the sink and rinse the block under hot water until there are no more suds.

sink 4

Next, I gently squeeze the block so it is not dripping wet, but still fairly wet.  Finally, I spread the block out on a thick towel and pin the four corners.  Then I just let it air dry.  I should mention that I pre-wash all of my fabric in Synthrapol before even beginning the block.

sink 6

sink 7

So…while the block was drying, I started the next block of Civil War Bride.  First I traced the block…

cwb 1

….then I made lots of bias.  (You can never have too much bias!)

cwb 2

Oh!  And speaking of Civil War Bride, I finally made a decision.  I chose Nest #2!  Instead of putting 5 eggs in the nest just like the pattern, I chose to add 3 eggs…an egg to represent each one of my lovely children!

nest 7

Til next time….

Kerry

A Bit of Catch-up….

This block from Civil War Bride needed a butterfly in the bottom right hand corner before it could be considered “Officially Finished”.

bird block

However, I wanted to find a really interesting fabric for the wings.  A fabric  that would do the butterfly proud!  So I waited patiently.  Then, I came across this chunk of fabric in my stash.  (For those of you who are wondering, I am taking every bit of fabric for this quilt from my stash.)  I love this type of fabric!  The pattern repeat is symmetrical, rather than asymmetrical.  These fabrics are rare, so grab them when you find them!

fussy cut 3

This dark curly part caught my eye.

fussy cut 1

I cut the butterfly wings out of the fabric so that the wings would be mirror images of each other.  I placed the pattern so that the black curly part would be somewhere near the middle of the butterfly.  The beauty of doing this, is that you never really know what you will end up with!

fussy cut 2

And here is the proud butterfly!

DSCN3497

So once I got that off my mind, I continued on with my “Friends of Baltimore” block.  I added some buds, stems and leaves.  If you look closely, you will see that I used 2 different greens for the wreath and the stems.   (Between you and I, that was a bit of an oopsy on my part.  Mum’s the word!)

wreath 1

Then came the  flowers, complete with buds and centers.

wreath 3

Next, came a pretty little bow…

wreath 4

… and, FINALLY, a couple of love birds!

wreath 5

Til next time….

Kerry

Think Happy Spring Thoughts!

I looked out the window this morning and this is what I saw!  Yikes!

snow day

So, I thought  I better get busy and think some Happy Spring Thoughts!  The next block from The Civil War Bride inspired me to think Spring!

First, I started with the branches and a few little leaves.

block 1

Then I added more leaves.

a few leaves 2

…and some more!

more leaves 3

Next, I added the bird’s feet and the underbelly of the bird. (If you let your imagination run wild, it looks like a folk art kind of bird…but just wait…!)  I used Ultra-Suede for these tiny pieces because they are really….tiny!  When using Ultra-Suede, I just cut out the pieces without adding a seam allowance and stitch it in place.  Easy peasy!

feet and underbody 4

Next came the rest of the bird.

bird 4

Then, I auditioned a few nests.  Should I choose Nest #1…….

nest 5

….or Nest # 2?nest 6

Til next time….

Kerry

Spring tease…

I was so tickled with how my wreath turned out I left it on my design wall and just kept staring at it in awe!  But, now its time to get on with the show!  Green fabric is not something that I am going to run out of anytime soon, so I used a good variety of fabrics for the leaves!

pattern 10

Now…time for the circles…and chocolate.  I find prepping and stitching circles a little tedious, so I use chocolate as an incentive.  I stitch a few circles…eat some chocolate…stitch a few more circles…eat some more chocolate….

chocolate

I was all set to glue the circles in place, but I did not want to interrupt nap time!  So I waited…and ate some chocolate…waited some more and ate some more chocolate!

sleeping kitty

Once Bruin finally woke up, I glued all the circles in place.  Fancy!

wreath

This picture is just a tease!  More details to follow!

vase (2)

Til next time…

Kerry

“Finish me! Finish me!”

This block from Sue Garman’s “Friends of Baltimore” was staring at me from the design wall.  It was saying: “Finish me!  Finish me!”  So I did.

almost finished

I had not gotten around to adding the section to the front of the book.  I was afraid it was going to be a little… fiddly. (Definition of fiddly: requiring close attention to detail : fussy; especially : requiring an annoying amount of close attention).  It was!

pattern

Here is what I did.  I ironed a piece of freezer paper to the back of the fabric that I was going to write “Album” on.  I did this so the fabric would not slip around while I was writing on it.

album 2

Using my light box, I traced the word “Album” with a permanent marker.

album 3

I traced the finished line with a Frixion marker, so that line would eventually disappear.

album 4

Bruin likes to pay close attention to the details!

album 8

Next, I took the freezer paper template and ironed it to the back of the fabric with the writing on it.  I used the line I drew with the Frixion marker to place the freezer paper template in the correct spot.

album 6

album 7

Once that was all done, I prepped the piece as usual.

album 9

Next, I prepped the beige piece…

album 11

….and here we go…An Officially Finished Block!

finished album

Til next time…

Kerry