Third block of “Love Is In the Air”

Yesterday afternoon I started to prep the third block in “Love Is In The Air” a pattern designed by Lori Smith.  I thought the blocks were a tad small (8 1/2″), so I enlarged them 125%.  I cut my background blocks 15″ square and I will trim them down slightly when I decide what kind of sashing to make.  I love working on a quilt this way.  So many unknowns and so many possibilities!!

I am using a fat quarter bundle of shirtings for the backgrounds (each square will have a different background).  And I am trying really hard to make this quilt as scrappy as possible.  Very liberating!

Like most blocks, it all started with the stems and leaves…..

DSCN7630

…..and then a pretty flower!

DSCN7631

I love using as many greens as I possibly can for the leaves.  I try to include as many different patterns and textures as I can.

DSCN7636

The whole time I was prepping all the leaves and buds, I was worrying (yes worrying!) about what kind of fabric I should use for the vase.   The vase fabric shouldn’t be the focal point of the block, but it shouldn’t disappear into the background, either.  I searched until I found a fabric that I think fit the bill.

DSCN7638

And here is the prepped block waiting to be stitched!

DSCN7639

So far, so good!

DSCN7640

I have been making some pretty steady progress on my hexie quilt.  I am hand quilting it with the Baptist fan design.  So relaxing!!

DSCN7624

Til next time….

Kerry

Everything I Know About Making Bias Strips!

I love (love!) when people ask me questions about something I post on my blog.  For that reason, I am going to show you how I make my bias strips, which I use for stems.  First, let’s start with my pressing board…..it is a wooden board approximately 18″ x 18″ x 1″ that I have covered with a few layers of cotton fabric, so that the surface it still hard.  I have tried making bias strips on my ironing board (it has a very soft, thick pad on it) and it does not work at all.

When I use my 1/4″ bias maker, I cut my strips 1/2″ wide.  If you cut your strips even a 1/16th of an inch narrower, the strip will not go through the bias maker properly.

DSCN7571

Next, I spray the strip with starch.  I like to do one strip at a time because the starch dries fairly fast and you do not want the strips to be dry. Your strips  should be very damp when you put them through the bias maker.

DSCN7574

Using my stiletto, I guide the strip into the bias maker.

DSCN7575

Next, I turn the bias maker over and continue to guide the strip so that the end comes out the other side.

DSCN7576

Now I lay everything on my pressing board and place a pin through the bias and into the board.  You will be glad you did this!

DSCN7578

I take my iron in my right hand and slowly move the bias maker with my left hand and press along the folded bias strip.  Important note:  I don’t leave any space at all between the bias maker and the iron.   Also, I use the flat edge of the iron, rather that the tip of the iron.

DSCN7579

It’s as easy as that!!

DSCN7582

This is a post you might be interested it.  It shows how to use up your short pieces of bias so that no one will be the wiser!!

dscn57031

Til next time…..

Kerry

Bed of Roses – Block 8

My husband, Paul and I arrived home today after being away at “The Farm” for the past week.  “The Farm” is lovely piece of rural property belonging to Paul’s brother and sister-in-law situated right in the heart of Craighurst, Ontario.  It was an awesome place to ring in the new year!IMG_1962

Of course, I packed every quilt-related thing I could think of….my sewing machine, iron and ironing board, so I could work on Trail Mix.  I managed to get 2 complete rows sewn together.

DSCN7570

I also brought along my hand quilting supplies (including my hexi quilt top, batting and backing, every quilting needle I own, 3 different thimbles, my small hoop etc.) just in case I had time to baste my layers together.  Not only did I find the time, I found the perfect space to baste!  I started this quilt about a year ago when I first discovered Inklingo. You can read about that post here.  Spoiler Alert:  Stitching hexies using the Inklingo method is addictive.  Very addictive.

DSCN7560

Each day I set myself up in front of the window and quilted for an hour or two.  Heaven!

DSCN7565

DSCN7564

And, (of course!), I brought along Block 8 of Sue Garman’s “Bed of Roses.  So, if you have been following along, you already know what I do first.  First, I trace the pattern onto the background with a Clover water soluble marker.  Block 8 (along with Blocks 1-7) are available on my website Simple Bird Studio.

DSCN7533

Next, I made my bias stems using a 1/4″ bias maker.  I like to put my stems in a plastic container (this particular container used to hold mushrooms!) and then I spray the starch into the container.  That way I am not wasting any starch and the spray is contained to one area.

DSCN7537

DSCN7535

Once I glue all of the stems onto the background, I stitch them in place before I add any more pieces.

DSCN7539

These next little flowers were easy to do.  Notice I drew the seam allowance on the pieces before I placed them on the background.  I find this such a simple way to make sure that all of the layers line up.

DSCN7543

DSCN7544

DSCN7545

Next, I added a few leaves…..

DSCN7546

….and a few more flowers!  Now it’s starting to look like something!!!

DSCN7549

This next piece has a pretty deep curve in it.  Yikes.  Just take a deep breath and go for it!

DSCN7542

DSCN7552

Now for the fun part.  Circles.  Lots of circles!!

DSCN7553

DSCN7554

DSCN7555

And, to top it all off, a cute little vase!

DSCN7559

And here is the completed block.  Lovely!

DSCN7557
So far, so good!!

DSCN7569

Til next time…

Kerry

Bed of Roses – Block 7

Simple.  Easy.  That is how I am going to describe Block 7 of “Bed of Roses”.  Seriously.  Take a good look at the shapes and I think you will agree!

Let’s get started!  First, I traced the block onto the background with a water soluble marker.

DSCN7497

Next, I used a 1/4″ bias maker to make all of the stems.

DSCN7498

DSCN7499

After I finished stitching the bias stems in place, I went along my merry way prepping the many pieces.  Instead of tracing my templates, I simply photocopied the pattern onto freezer paper.  All of the pieces in this block are symmetrical, which means you do now have to worry about making mirror images.

DSCN7500

So now its time to start gluing the pieces in place.  I started with the small flowers and leaves.

DSCN7504

DSCN7505

Next, I added the pretty pink flowers.

DSCN7506

I love these dark pink centers!

DSCN7508

Looking good!

DSCN7509

Now I started on the larger flowers.

DSCN7525

DSCN7526

DSCN7527

DSCN7528

The excitement is definitely mounting!

DSCN7529

Now I am going to show you how I tackled the center section.  The center consists of 5 separate pieces, which if layered one on top of the other, would be very bulky.  So this is how I eliminated the bulk.

I prepped all of the pieces in the usual way.

DSCN7510

DSCN7511

Next,  I glued one section on top of the other…

DSCN7512

…and stitched it in place.

DSCN7513

Once I finished stitching the piece in place, I very (very!) carefully trimmed away the first layer, leaving a 1/4″ seam allowance.

DSCN7515

DSCN7516

Okay, now I repeated those same steps with each new layer.  I glued the yellow piece in place….

DSCN7517

….and stitched it in place.

DSCN7518

And I trimmed out the second layer.

DSCN7519

And here is the second last piece stitched in place.

DSCN7521

And trimmed.DSCN7522
And, finally, the last piece!

DSCN7523

The rest of the leaves and……Voila!

DSCN7531

You can find Block 7 (along with the 6 previous blocks) of Sue Garman’s “Bed of Roses” on my website Simple Bird Studio.

Til next time….

Kerry

Save those scraps!

I have been working away on the second block of “Love is in the Air” a pattern designed by Lori Smith.  I purchased this pattern a couple of years ago and put it away with the rest of my patterns.  Honestly, I forgot all about it.  About a month ago,  I went through my patterns and books in search of a simple applique pattern that would lend itself to a really scrappy feel.  As soon as I “found” this pattern in my box of (far too many) patterns, I knew “Love is in the Air” was exactly what I was looking for!  For those of you who may want to stitch these blocks along with me, the pattern is available here.

As I mentioned in my last post, I am using a collection of shirting for the backgrounds, so that means that each background square will be different, which I am not going to lie has me a little unsettled.  But I do love a challenge!

Also, I enlarged the patterns by 125%.  I cut my background squares 16″ x 16″, but I am not sure right now what size they will end up.  I never have all the details figured out before I start a quilt….what fun would that be?   Sometimes you have to listen to the quilt!

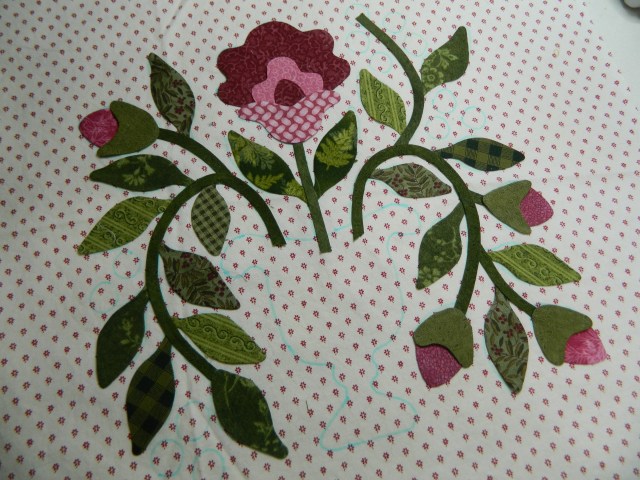
I started this block by tracing the pattern onto the background with a water soluble marker.  Next, I made a bunch of leaves, using many different fabrics, just for the fun of it and then I auditioned them.  Some I like.  Some I don’t.  Some of the leaves are competing with the background, so I will save those leaves for another project!

DSCN7454

DSCN7455

OK, next I added my stems.  Notice I used the same fabric for all of the stems, just to give a bit of consistency.

DSCN7457

Next, I went searching through my scraps and I found this piece of fabric I have had for about 8 years.  I love this fabric!  So I decided to use it for the 4 main flowers.

DSCN7463

Then I went through my scraps and found a fabric that went with the flower fabric.

DSCN7461

Next, I went through my blues and golds and chose a few fabrics that played nicely with the main flower fabric.   So far, so good!

DSCN7464

DSCN7466

This patterns has a circle in the centre that I could make with a piece of bias and  a 1/4 bias maker, but I chose to make a template instead and prep it in the way I prep all of my templates.  So much easier!  Instead of tracing the circle from the pattern, I used a compass to get a more accurate shape.
DSCN7467

I cut the circle out and ironed it to the wrong side of the fabric.  I decided not to cut the centre of the fabric out just yet, to keep it more stable.

DSCN7468

Using starch, a stiletto and a mini-iron, I prepped the outside edge.

DSCN7469

Next, I trimmed out the centre and prepped the inside edge.

DSCN7470

Taking the freezer paper out is always fun (and kind of scary!) but it works like a charm every time!

DSCN7477

DSCN7478

Once it is glued in place, it looks very neat and tidy.  Whew!!

DSCN7479

So, I auditioned several fabrics for the centres of the main flowers…brown, black, burgundy, blue…nothing appealed to me.  Then I tried gold.  Gold it is!!  But wait….

DSCN7481

I thought the gold circles were a tad too big, so I made them a shade smaller.

DSCN7486

Ahhhh.  That’s much better!

DSCN7484

Here’s a fun fact… I used three different golds in this block.  After all, it is a scrappy quilt!

DSCN7488

And here are both blocks.  Sweet!

DSCN7487

Keeping with the scrappy theme, I am working away on Trail Mix, a quilt designed by Laundry Basket Quilts.  I chuckled when I saw this block.DSCN7451

In this block alone, there is a scrap from my hexie quilt I worked on last winter,

DSCN6717

DSCN6995

…a scrap of the background of my Civil War Bride Quilt….

DSCN4727

DSCN6141

….and a piece of the background of my Reminescence.  Memories!

detail of Rem.

Til next time….

Kerry

Trail Mix Progress and a new project!

I have been making steady progress on my Trail Mix quilt, designed by Laundry Basket Quilts. I must say it is rather addictive cutting and stitching all those tiny little pieces.   Sometimes when I start a new quilt, I set up some rules or guidelines for that quilt.  The rule for this quilt is that I can only use fabrics I have on hand.  It certainly is a nice feeling to use the last bits of some of the fabrics I have had for…well, a really, really long time!!!

Ok, so, you make 4 of these units….

DSCN7428

…..and stitch them onto these scrappy blocks.

DSCN7424

Here is the first one which fit like a glove!

DSCN7425

Here are the second and third units….

DSCN7427

I was absolutely delighted when the fourth unit actually fit where it was supposed to without any puckers or pleats!  One down, eight more to go.  Yikes!

DSCN7430

So, keeping that scrappy theme, I have started a new applique project that will also have a scrappy feel.  The pattern I am using is “Love is in the Air” by Lori Smith.   I enlarged the patterns by 125% to make the blocks bigger than the original size (8 1/2″).  I am also going to make a scrappy sashing, but more about that later!

DSCN7450

For my background fabrics, I am also going with a scrappy look.  I have had this collection of shirtings long enough.  It is now time to use them up!  I’m going to use a different background for each block.  Can’t wait to see what that looks like!!

DSCN7449

I started this block like I start all of my applique blocks, I traced the pattern with a blue Clover water soluble marker.  Then I made some bias for the stems (using my 1/4″ bias maker) and I started to make some leaves.  When I do go fabric shopping, I am always on the look out for green fabrics (especially olive greens) that would make awesome leaves.

DSCN7432

DSCN7433

DSCN7435

Next, I chose the fabrics for my flowers.

DSCN7436

Each flower has a “bud” and so I chose this darker purple (on the right) as the bud.  I thought there was enough contrast….

DSCN7438

…but, as you can see, there really isn’t much contrast.  Unfortunately, the bud gets lost.

DSCN7437

So, I opted for a darker, more tone-on-tone bud for both of the flowers.  So far, so good!

DSCN7440

Next came the tail feathers for the bird.

DSCN7442

DSCN7443

DSCN7444

And finally, the rest of the bird!  Do you recognize the blue fabric I used for the bird body?  It is the same fabric I used in my Mom’s quilt.  You can read that post here.

DSCN7447

Til next time……

Kerry

Bed of Roses – Block 6

Here we are at the half-way mark!  We have stitched 6 blocks (and a few corner triangles and side triangles) and so now we only have 6 more blocks to go!

I have said it before and I will say it again…these blocks are easy and very suitable for a beginner.  You can use whichever method of applique you choose.  I use the freezer paper with starch method.  You can check out my videos here.  Always good for a laugh!

Block 6 started out a little differently than the previous blocks.  The leaves were glued in place first and then the bias stems.DSCN7390

DSCN7392

Next, I added some simple leaves.

DSCN7393

And some pretty pink flowers with yellow centers.  I love the added detail of these yellow centers.  The square edges give some contrast to all the curvy pieces.

DSCN7394

DSCN7397

I decided to work on the center section.  The yellow piece is the most challenging piece in this block, but you shouldn’t have any problems with it!  As I mentioned earlier, I use freezer paper as a template and press the seam allowance over the template with starch and a mini-iron.  When I am done prepping the piece, I pop the freezer paper out.  It is that simple!!

DSCN7403

Now I add a small drop of Roxanne’s glue to each petal and place it on the block.

DSCN7404

DSCN7406

It’s starting to look impressive, no?  (I bet you are saying to yourself…”I bet I can do this!!”)

DSCN7407

So, next, I prepped these pieces and stitched them in place.

DSCN7408

I don’t like to add all the circles at once.  I find the thread can get tangled up in the circles that are glued in place and not stitched yet.  So first I added the dark circles and stitched them.

DSCN7410

DSCN7409

I added the lighter circles in each section and stitched them in place, one section at a time.   Sometimes I like to break things down in parts or sections.  That way I don’t get overwhelmed:)

DSCN7411

One more section to go.  Yippee!  I have come to the conclusion that Bruin is my Vanna White.

DSCN7412

And, finally!  Here is the finished block.  Beautiful!

DSCN7413

So here are all 6 blocks, which are available on my website Simple Bird Studio.  I also sell all of the notions I use including my favourite mini-iron.

DSCN7423

I have been slowly working away on Trail Mix, a pattern designed by Laundry Basket Quilts, which is available on Craftsy.  The online class is awesome with lots of helpful hints on how to use up those scraps.

DSCN7420

Sweet!  DSCN7422

Til next time…..

Kerry

Washing my Baltimore. Yikes!

Last weekend was Thanksgiving in Canada and, like most people we had a super busy long weekend.  We had the family over…just 26 of us!  I cooked a huge turkey and all the fixins!  Hubby bought himself a new camera, so we headed north to Meaford and Thornbury to take some awesome photos and to get some apples.  Is it my imagination or are the leaves really spectacular this year?

I also had a few spare hours, so I decided it was time to bite the bullet and toss my Friends of Baltimore into the washing machine.  Let me explain why I did this.

DSCN7363

I am not sure if you remember this, but when I washed one of the borders, some of the fabrics ran (red and dark blue) which shocked and upset me.  I was shocked, because I am very careful about pre-washing all of my fabrics. Since I used all the same fabrics in the blocks as in the borders and this was the first time any of the fabrics had run, I was really puzzled.  I was upset because my quilt had very distinct red and blue splotches on the background.  I finished the top and had it quilted, knowing that one day I was going to have to deal with those darn splotches.  Well…that day had come!

I talked to Colleen from Elite Quilting who knows everything there is to know about bleeding fabric and how to fix it. Imagine the look of sheer horror on my face when she nonchalantly suggested I wash the entire quilt in the washing machine with Synthrapol.  It took more than a little coaxing on Colleen’s part to assure me that all of the bleed marks would come out and my quilt would not be ruined.

So I gathered my quilt up, added a whole bottle of Synthrapol, put it in the washing machine using the hottest water possible, crossed my fingers and prayed to the Quilt Gods.  I stood there for 40 minutes and watched the quilt go round and round.  I called Colleen for some support…twice!   This is a picture I took of the quilt spinning around.  You can see that Bruin is as concerned as I am!!

DSCN7364

I am not sure why I felt compelled to stand there and watch.  I stopped the washing machine and opened the door just to check up on it a few times.  I was very thankful that all looked good!

Once the washing machine stopped, I gathered the quilt up in a clear bag, and whisked it over to my husband’s shop where we laid it out flat on some tables to air dry.  I was so very thrilled to see that all of the marks had completely vanished and, more importantly, my quilt had not fallen apart!! Yes, so much to be thankful for!

I am also working away on a scrappy quilt designed by Edyta Sitar of Laundry Basket Quilts called Trail Mix.  It is a great stash-buster.  Here are the strip pieced diamonds, which I am now going to go and stitch together!

IMG_1767 (1)

Tile next time…

Kerry


Wait til you see this!!

When I (finally) finished the applique on “To Everything There Is A Season”, I handed it over to Rose from Fancy Feathers with my usual set of instruction.  My instructions were:  “Do whatever you want.  Surprise me.”  I am that kind of quilter!

So when Rose called Thursday to say the quilt was ready, I could not wait more than a day before I went to get it.  To say Rose did a spectacular job is putting it mildly…extremely mildly!!

I love everything about the way Rose quilted it.  I especially love how the feather borders inside each block do not go all the way around the block, and have a random feel to them.  Love it!!  This pattern was designed by Marilyn at MT Designs.  Marilyn has not seen the finished quilt yet, but she will see it tomorrow at Thanksgiving dinner!  The individual patterns for each of the blocks are available on my website Simple Bird Studio as paper patterns for digital patterns.

So….here you go!

DSCN7371

DSCN7367

DSCN7368

DSCN7365

DSCN7379

DSCN7378

DSCN7377


DSCN7373

DSCN7374

DSCN7376

DSCN7375

DSCN7366

The centre medallion will take your breath away.  I wish you could see this quilt in person!

DSCN7381

DSCN7370

DSCN7383

Spectacular…right?

Till next time….

Kerry

Bed of Roses – Block 5

My goodness!  I must say the 1st of the month seems to sneak up on me!  I am just putting the finishing stitches on the fifth block of Sue Garman’s “Bed of Roses”, a BOM I started back in April.  I love this quilt because the blocks are actually easy (oh yes they are!) but the blocks don’t look easy.  I hope that makes sense!

Ok, so first I traced the block onto the background with a Clover water soluble marker.  Notice, I don’t trace what is inside the shapes, for example, the big flower.  The reason I don’t do this is because once the prepped piece  has been glued in place, it covers up all the inside markings and then you can’t see them.

DSCN7328

Next, I added all the bias strips.  I use a Clover 1/4″ bias maker to do all of my stems.  I glued them in place and then I stitched them before I added any more pieces.

DSCN7329

Next, I prepped the three pink flowers in the usual way.  I iron my freezer paper templates to the wrong side of the fabric and press the seam allowance over the templates with liquid starch and a mini-iron.  (Note to self…maybe its time to replace the fabric on my pressing board with something less grungy.)

DSCN7330

Once the piece is prepped, I take the freezer paper template out…

DSCN7331

…and then I place the template shiny side up on the prepped piece and mark any remaining seam allowances.  It makes lining up multiple pieces soooo easy.  Trust me!

DSCN7333

DSCN7332

DSCN7334

Next, I prepped the big flower that sits right in the middle of the block.

DSCN7335

Notice the marked seam allowances?  Now I know exactly where the next pieces go.  Easy Peasy!

DSCN7336

DSCN7337

I prepped a bunch of the yellow doo-dads and glued them in place.  I even marked the seam allowances on them!

DSCN7338

DSCN7339

Now I placed the green pieces in place.  See what I mean about being an easy block?

DSCN7344

So, now I added the tiny leaves and four smaller posies.

DSCN7345

Now it’s time to add some circles….

DSCN7347

DSCN7351

Lots and lots of circles!

DSCN7352

And, to top it all off, a sparkly little vase.  I am giddy with excitement!

DSCN7358

DSCN7360

Here are all 5 blocks so far.  All these blocks are available on my website Simple Bird Studio.

DSCN7361

Last weekend was the quilt show at the Simcoe County Museum.  Ruth, from Stitiching Impressions, kindly displayed my “Friends of Baltimore” quilt at her booth.

Ruth Quinn

My friend Kathy and I go to the show every year.  Not only do we love to see the awesome quilts, we love  to have a piece of Sugar Pie!  Of course, we did a bit of shopping at the Merchant Mall.  New fabric and pie….does it get any better?

IMG_1711

What else am I working on?  Oddly enough, I am enjoying sitting at my sewing machine working on a scrappy quilt called Trail Mix, designed by Edyta Sitar of Laundry Basket Quilts.  So much fun!

DSCN7362

Til next time….

Kerry