A Challenge…or is it?

As I was getting ready to start the next (and last!!) block of Civil War Bride, I noticed the horse shapes looked a little challenging.  If I were to cut in between the horse’s legs, there would not be much of a seam allowance.

horse 1

Don’t get me wrong, I am always up for a challenge!  But it just takes a few simple steps to turn a challenging shape into something very do-able.  So here is what I did…

First, I added a few lines.

horse 2

So, now I have 3 very simple shapes!

horse 3

I prepped the legs and glued them in place…

horse 4

I started to prep the body, but I thought the ears looked a little dicey.  So I drew a line…

horse 6

…..and I made another simple shape.

horse 8

I glued the ear in place…

horse 9

And, finally…a very easy to stitch horse!  And I didn’t even break a sweat!

horse 11

With this cooler than normal weather, I am able to hand-quilt most nights.  The borders are coming along very nicely.  I am finished the bottom border and I have passed the half-way mark of the side border.

DSCN4279

DSCN4281

Finally, here is the last completed block of Civil War Bride!

cwb

Til next time….

Kerry

An Epiphany!

I must say I am pleasantly surprised at how quickly I am quilting the borders of “Bouquet For A New Day”.  The bottom border is finished and I have now marked the side borders.  As I was marking the borders, my mind wandered and I had an epiphany!  ( a sudden realization–a flash of recognition in which someone or something is seen in a new light).

I thought…it is all well and good that the borders match up in the center of the border.  But…wouldn’t it be interesting to put a design or something at the center and have the borders flow out from the design?? I thought it would be fun to incorporate 2013 in the top border (the year this quilt better be finished!)  So here is what I did…

First, I found a font in Illustrator that suited the quilt.  Then I drew an oval around it and printed it out.  The borders are only 5″ wide so the design could only be around 4″ tall.  Next, I drew some  lines on the pattern to help center it on the border fabric.

1 (2)

I put the quilt on my light box and placed the pattern just under the top layer.  I used the lines on the pattern to make sure everything was nicely centered.

2

Next, I drew the lines with a Frixion marker.

DSCN4252

Then, using the stencil I continued drawing the border, until I reached the oval.

4

I flipped the stencil over and continued on my merry way.  Easy peasy!

3

In the meantime, I have been working away on the next Civil War Bride block.  This block consists of a lot of layering.  For instance…first the leaves, then the stem and then the feet!

5

This is the block so far!

DSCN4258

Til next time….

Kerry

An Intriguing Ostrich!

Even in this heat, I am still managing to get some hand-quilting done!  Here is another block from Sue Garman’s “Bouquets for a New Day”.

DSCN4045

With only 2 blocks left to quilt, I am starting to give some thought to the borders.  The half-square triangle inner border has me a little stumped.  Not sure how I will quilt all those triangles!  The good news is, I found a stencil that I love for the outer border.  Not only do I love the cable design, it fits the border perfectly!

DSCN4047

Now that I (0nly!) have 5 blocks left of Civil War Bride, I am getting really antsy to finish it!  I love this next block!  I must say I really don’t know too much about ostriches.  But I find them intriguing, just the same!  First I started with the stems and some leaves.DSCN4052

Next, I added some pretty pink flowers.

DSCN4053

I used Ultra-Suede for the legs and beak.

DSCN4056

Next came the fun part!  I found this fabric in my stash (of all places)!  It is one of those landscape fabrics that looks like tall grass.  It has stripes of different colours and shapes of grass, which I think is brilliant.

DSCN4054

I turned the fabric upside down and here is what I saw….ostrich feathers!

ostrich

And here is one very intriguing ostrich!

DSCN4058

Til next time…

Kerry

Setting the Table

For some reason, this block seemed to be taking a long time!  Finally, it’s finished!

The first thing I did was change the carpet.  I wanted the tablecloth to be the focus of this block.  The first fabric I used for the carpet fought with the fabric for the tablecloth, so I changed it.  Maybe it’s because they both read as “mediums” or maybe it’s because they are both “busy”.  Either way, it just wasn’t working!   I prefer to audition a few (or more!) fabrics until I find the one that screams “I am the one!”

Out with the old…

DSCN3998

…in with the new!

table 2 (2)

Next, I  added the bottom layer of the tablecloth.  I did not need to make another template, I just used the one from the original tablecloth.  Of course, it didn’t have to be the full size, so I just used what I needed.

same pattern

Then, I added the vase, some vines and a couple of apple stems.  The fabric for the vase is from a line called “Maid of Honor” by Bonnie Sullivan and Maywood Studios.  It actually looks like cracked pottery!

table 4 (2)

Lots of leaves followed, along with a couple of apples. Or are they peaches?

table 4 (1)

This morning I embroidered the cherry stems…

table 6 (2)

…and yippee!  This block has just had a bubble bath and is resting comfortably!!

block 7

Til next time…

Kerry

I See Table Legs!

Every quilter looks at fabric differently.  Some see color, some see patten and some see possibilities!

When I started thinking about choosing fabrics for the next block of Civil War Bride, I wanted to do something really special for the table legs.  I searched high and low through my stash and this is what I found!  Do you see the table legs?

tb1

First, I measured the width of the stripe I wanted to use.

measure 3

Then I measured the pattern.  Pretty close!

measure 2

So I cut the freezer paper templates out and placed them very carefully on the wrong side of the fabric.

tb5

Since I will be using one of Karen Kay Buckley’s “Perfect Circles” for the round part, I am just cutting straight pieces for the legs.

tb4

Here are the legs.

tb6

Moving right along to the table cloth!  This is how I traced the tablecloth.  First I traced just half of the pattern on the freezer paper.

tb9

I folded it in half and cut along the line.  Call me crazy, but I like when both halves of a pattern are exactly the same!

tb10

Next, I ironed the pattern on the back of the fabric making sure that the pattern was centered.  I wanted the red stripes to be at each end of the table.

DSCN3997

…and here we go!  There is still a piece that goes under the tablecloth, I just have to choose a matching fabric!

DSCN3998

Til next time….

Kerry

Another block…another nest!

Time to start another block of Civil War Bride.  I almost(!) have enough blocks to sew another row together!!  And you know how excited I get when I can stitch another row together.  So here we go…

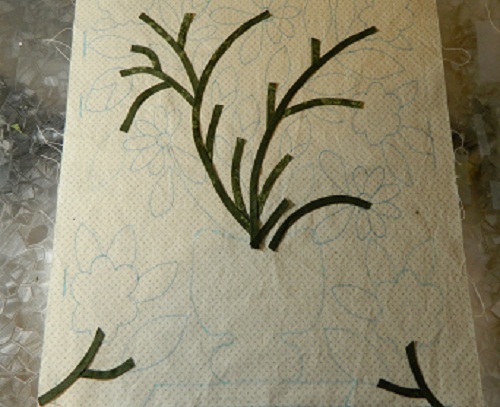
First I prepped the branches and stitched them in place.  I used a brown fabric with shocking pink little flowers on it just to give the block a bit of oomph!  (Definition of oomph…An extra push. An ingredient or a factor that will make something better or perfect.)

a

Next, came the leaves and the nest.  Do you recognize the nest?  You may have seen it here.

c

So, keep this tip in mind if you are making this quilt.  You can make a couple of nests, audition them both, and use both!  Waste not, want not and all that jazz!

Then, I placed a bird in the branches.

d

I really like to use Ultra-Suede for the feet and the beaks.  First, I cut 2 triangles for the beaks.  You don’t have to include a seam allowance, except for the part that goes under the body.

h

I glued  half of the beak in place then trimmed a tiny bit of the corner off.

j

Then I glued the other half of the beak in place.  I trimmed  a bit of the corner off, also, so that the triangles  would not overlap.  Ultra-Suede is rather thick!  Finally, I put the bird fabric back in place and stitched it in place,  stitching right through Ultra-Suede, and into the background.

k

On to the feet!  I ironed the freezer paper templates onto the Ultra-Suede.  I am not really sure if there is a wrong side or a right side. They both look good to me!

l

So I cut the feet out and  placed them under the body.  At this point, the entire body has not been stitched in place yet. When I stitch the Ultra-Suede in place I try to match the color of the thread as closely as I can.  I take just a tiny “bite” of the Ultra Suede and (very important) I don’t pull the thread too tight.  If I do, then the Ultra-Suede looks dimpled along the sewn edge.

m

Since I wanted this to be a male bird, I added a golden brown wing and tail.  Very manly!

n

I wanted the second bird to be female, so I chose a pretty fabric for her body and a nice red feather and tail.  I added the eggs to the nest and…Voila!

block

Til next time…

Kerry

A Productive Day!

It is not very often that I sit at my sewing machine and stitch the day away, but that is what I did yesterday!  I cut out and stitched…get ready….12 blocks from Grandmother’s Choice Block of the Week!  My plan is to make 3 quilts using these 8″ blocks, so I am stitching 3 variations of the same block.  I love to see how different fabric placement can drastically change the look of the block.  Here are the blocks:

This block is called “I Am An Anti”.  Honestly, I did not fussy cut the pink squares on purpose.  It just happened!

DSCN3595

Next on the runway is “Carrie Nation”.

DSCN3596

Followed by “Mr. Roosevelt’s Necktie”.

DSCN3597

And, last but not least, is “Jack’s Delight”.

DSCN3598

Jenny and Bruin like to keep me company when I sew.  They are kind of  famous!  Check out their youtube video here.

bruin

jenny and bruin

This is my latest finished block from “Bouquets For a New Day”. 5 more blocks to go!

bfand 1

The navy blue fabric in the vase is left over from an Irish Chain quilt I made for my Mom.

irish chain

Most of this block from “Civil War Bride” is stitched in place.  I started to think that maybe the table that the vase is sitting on is too dark for the overall look of the block.  So I cut out another table piece and auditioned it.  I do like it better.

cwb 1 (2)

My #1 rule in applique (and life) is this….fix something while it’s in the block stage, rather than finish the whole quilt and kick yourself because you were too busy…or too tired…or too lazy to fix it!  I have been guilty of all 3!

Til next time…

Kerry

Stitching the Night Away

Most evenings you will find me on the couch, hand-quilting the night away.  Once my needle hits the fabric, all the stress and tension of the day just seems to melt away.  Here is the latest block of Sue Garman’s “Bouquets For A New Day”.  So, now  I have 6 blocks quilted, and 6 more to go…oh… and a border.  (Heavy Sigh)

hand quilting

I have started working on the next block of Civil War Bride.  It can be tricky to figure out what order to place the stems on the background.  If the raw edge of “Stem A” is going to be covered with “Stem B”, then “Stem A” needs to be glued in place first.  (It’s easier than it sounds!!)

First, I put a few dabs of glue along the traced line, rather than putting glue on the actual stems. This will be “Stem A”. You can see that this stem will be covered by another stem.

cwb 3

Next, I carefully placed the stem on the line.  Because the stems are cut on the bias, they are easy to curve along the line.

cwb 4

Then,  I used the line that the next bias strip will be placed on as a guide to trim the stem to the correct length.  I have added a few dabs of glue to hold the next stem in place.

cwb 5

Now, another stem is in place….This is also a “Stem A”.

DSCN3521

And, finally, the longer stem that covers these shorter stems is glued in place.  This is “Stem B”.

cwb 6

So…here are a bunch of “Stem A’s”, waiting to be covered by one long “Stem B”.

glue

large stem

And, finally…all the stems are in place!

all stems in place

I thought this block needed a really special vase!   So I fussy-cut this fabric…

fabric 1

…and ended up with this vase!  Spiffy!

vase 4

Next, I added some buds….

buds

…and leaves and flowers!

buds leaves and flowers

Til next time…

Kerry

Finish a block…start a block!

Darn it!  Does this ever happen to you?  I was stitching merrily along, when I thought my stitches felt a little weird.  Then I noticed my background had folded over on itself and I was stitching through two layers.  I keep my stitch ripper handy for occasions just like this!

stitch 2

So, once the block was finally finished, I did what I do to all my finished blocks….I gave it a bath!  I like to wash everything out of my block…like glue, starch and anything else that shouldn’t be there!  First, I fill the sink with very hot water and a bit of soap.

sink 1

Next, I take a very deep breath…and then I toss my block into the water.

sink 3

I usually let it soak for a couple of hours.  Then I let the water out of the sink and rinse the block under hot water until there are no more suds.

sink 4

Next, I gently squeeze the block so it is not dripping wet, but still fairly wet.  Finally, I spread the block out on a thick towel and pin the four corners.  Then I just let it air dry.  I should mention that I pre-wash all of my fabric in Synthrapol before even beginning the block.

sink 6

sink 7

So…while the block was drying, I started the next block of Civil War Bride.  First I traced the block…

cwb 1

….then I made lots of bias.  (You can never have too much bias!)

cwb 2

Oh!  And speaking of Civil War Bride, I finally made a decision.  I chose Nest #2!  Instead of putting 5 eggs in the nest just like the pattern, I chose to add 3 eggs…an egg to represent each one of my lovely children!

nest 7

Til next time….

Kerry