Finish a block…start a block!

Darn it!  Does this ever happen to you?  I was stitching merrily along, when I thought my stitches felt a little weird.  Then I noticed my background had folded over on itself and I was stitching through two layers.  I keep my stitch ripper handy for occasions just like this!

stitch 2

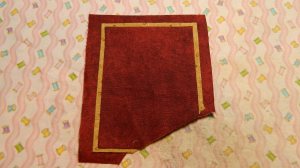
So, once the block was finally finished, I did what I do to all my finished blocks….I gave it a bath!  I like to wash everything out of my block…like glue, starch and anything else that shouldn’t be there!  First, I fill the sink with very hot water and a bit of soap.

sink 1

Next, I take a very deep breath…and then I toss my block into the water.

sink 3

I usually let it soak for a couple of hours.  Then I let the water out of the sink and rinse the block under hot water until there are no more suds.

sink 4

Next, I gently squeeze the block so it is not dripping wet, but still fairly wet.  Finally, I spread the block out on a thick towel and pin the four corners.  Then I just let it air dry.  I should mention that I pre-wash all of my fabric in Synthrapol before even beginning the block.

sink 6

sink 7

So…while the block was drying, I started the next block of Civil War Bride.  First I traced the block…

cwb 1

….then I made lots of bias.  (You can never have too much bias!)

cwb 2

Oh!  And speaking of Civil War Bride, I finally made a decision.  I chose Nest #2!  Instead of putting 5 eggs in the nest just like the pattern, I chose to add 3 eggs…an egg to represent each one of my lovely children!

nest 7

Til next time….

Kerry

A Bit of Catch-up….

This block from Civil War Bride needed a butterfly in the bottom right hand corner before it could be considered “Officially Finished”.

bird block

However, I wanted to find a really interesting fabric for the wings.  A fabric  that would do the butterfly proud!  So I waited patiently.  Then, I came across this chunk of fabric in my stash.  (For those of you who are wondering, I am taking every bit of fabric for this quilt from my stash.)  I love this type of fabric!  The pattern repeat is symmetrical, rather than asymmetrical.  These fabrics are rare, so grab them when you find them!

fussy cut 3

This dark curly part caught my eye.

fussy cut 1

I cut the butterfly wings out of the fabric so that the wings would be mirror images of each other.  I placed the pattern so that the black curly part would be somewhere near the middle of the butterfly.  The beauty of doing this, is that you never really know what you will end up with!

fussy cut 2

And here is the proud butterfly!

DSCN3497

So once I got that off my mind, I continued on with my “Friends of Baltimore” block.  I added some buds, stems and leaves.  If you look closely, you will see that I used 2 different greens for the wreath and the stems.   (Between you and I, that was a bit of an oopsy on my part.  Mum’s the word!)

wreath 1

Then came the  flowers, complete with buds and centers.

wreath 3

Next, came a pretty little bow…

wreath 4

… and, FINALLY, a couple of love birds!

wreath 5

Til next time….

Kerry

“Finish me! Finish me!”

This block from Sue Garman’s “Friends of Baltimore” was staring at me from the design wall.  It was saying: “Finish me!  Finish me!”  So I did.

almost finished

I had not gotten around to adding the section to the front of the book.  I was afraid it was going to be a little… fiddly. (Definition of fiddly: requiring close attention to detail : fussy; especially : requiring an annoying amount of close attention).  It was!

pattern

Here is what I did.  I ironed a piece of freezer paper to the back of the fabric that I was going to write “Album” on.  I did this so the fabric would not slip around while I was writing on it.

album 2

Using my light box, I traced the word “Album” with a permanent marker.

album 3

I traced the finished line with a Frixion marker, so that line would eventually disappear.

album 4

Bruin likes to pay close attention to the details!

album 8

Next, I took the freezer paper template and ironed it to the back of the fabric with the writing on it.  I used the line I drew with the Frixion marker to place the freezer paper template in the correct spot.

album 6

album 7

Once that was all done, I prepped the piece as usual.

album 9

Next, I prepped the beige piece…

album 11

….and here we go…An Officially Finished Block!

finished album

Til next time…

Kerry

How wrong was I??

Very wrong!  I had been wanting to start the next block of Sue Garman’s “Friend’s of Baltimore”.  Well!  I took one look at the block…and walked away!  It looked way too difficult.  Boy, was I wrong.

In fact, it was not difficult at all…almost a walk in the park!  Here is the freezer paper template. Yikes!

pattern 1

And here is the template ironed on to the wrong side of the fabric.  So far, so good!

pattern 2

I thought this is where it might get a bit dicey.  So instead of cutting out the entire design, I just cut a small portion and starched the seam allowance in place.

pattern 3

The next thing I knew, I was finished the inner part!

pattern 4

So I worked on the outer section until the whole piece was prepped!

pattern 6

I took a deep breath and removed the freezer paper…

pattern 7

And this tangled mess….

pattern 8

…turned in to this!

pattern 9

I would  like to thank the quilt gods for helping make this possible!!

Til next time…

Kerry

How Crazy Am I?

As I work away on Sue Garman’s “Friends of Baltimore”, I keep asking myself…”How crazy am I?”  These teeny, weensy pieces are a little…..tiny!   This is the actual freezer paper pattern.

freezer paper 1

First I made the tiny outer blue circle.

blue outer circle

Then, the teeny, tiny yellow inner circle.

finished yellow circle

Here is the flower, before the centre is added.

flower before

And here is the finished flower!

flower after

This is what I have accomplished so far!

vase 3

I have been working very steadily on Sue Garman’s “Bouquets For A New Day”.  Here is another finished block…

block

…and here is what I have completed so far!  It is starting to have an “almost finished” look to it!

blocks

Til next time…
Kerry

So darn excited!

I am really excited to be working on the next block of Sue Garman’s “Friends of Baltimore”.  When I finish this block, I will be able to stitch together another row, which I can then add to my first completed row!  I am going to start hyper-ventilating real soon!

rows

First I started with the vase.  The dark brown piece at the top was the first one to be stitched in place, and then the pieces below it followed.

vase 1

Next, the remaining dark brown pieces were stitched in place.  The long edges will be covered by the light brown sections, so the edges do not need to be turned under.

vase 2

vase 3

And, finally, the last section is added.  The top edge looks odd, but will be covered with flowers and leaves.

vase 4

Next, the handles were added and some stems and leaves.  Please allow me to gush about these leaves! I fussy-cut  each leaf with the lighter green “veins” running lengthwise.  I am pleased as punch!

vase 7

Now that the berries are in place, I can start to fill the vase with many, many flowers!

vase 8

I can’t think of a better way to spend the cold winter evening than hand-quilting Sue Garman’s “Bouquets For A New Day”.  Here is another completed block!

bouquet for a new day

Til next time…

Kerry

A Tasty Block!

Onward and upward!  I was eager to start the next block of  The Civil War Bride Quilt, so that is what I did!  First, I traced the pattern on the background with a Clover water soluble marker.  Next, I made some stems using my 1/4″ bias maker, and then, I stitched them in place.

stems 1

I wanted skinnier stems for the cherries, so I took the stems I made with the bias maker and folded them in half lengthwise.  They are really skinny!

stems 2

Next I added some leaves and a bunch of grapes….

grapes 3

….and then I added the pears, the strawberries and the apples….I started getting a little hungry!

grapaes 5

Next, I stitched all of the remaining leaves in place.  Jenny can hardly contain her excitement!

jenny

I added the cherries and Voila!  Another completed block!

completed block

For some reason, I was craving fruit salad…so I went to the fridge and dug out a pear, some strawberries, an apple and some grapes.  I did not ave any “real” cherries, but I did have some dried cherries.

fruit

I added a few pecans and had myself a very healthy snack!

fruit salad

Til next time….

Kerry

So Close to a Finish!

This block in Sue Garman’s “Friends of Baltimore”  is so close to being complete!  I am so excited!!  The only thing left is the Album that will sit in the empty space.

First, I made the spine of the Album…

book 1

…and then I prepped the red background of the Album.  I chose more of a burgundy red so the Album would stand out from the red flowers.

book 2

The skinny beige border is a full piece.  I think it is easier to work with a big piece rather than a skinny little piece!  And finally, the top red piece of fabric.

book 3

I added the spine…

album

…and I placed the Album in the basket……

almost finished - Copy

…and I topped it off with a flower and some leaves.  Voila!!

officially finished 6

Can’t wait to start the next block!  I am pre-washing the fabrics as we speak!!

pre-washing next block

Til next time…

Kerry

One Flower at a Time!

It may be cold, but the sun is shining (!) and we are all basking in it!!

sunshine

I am slowly filling my vase one flower at a time.  I added a few buds and a tulip…

a few more flowers

…and more flowers and leaves.

continuing along

I love these roses!

roses (2)

So here is the vase full of flowers!  Time to start the Album that will fill that empty space!

getting there

Til next time…

Kerry

It’s the little things that amuse me!

Believe it or not, this is a freezer paper template!  Pretty tiny!

tiny piece 2 (2)

And this is the prepped piece.  Stop the madness!

tiny piece 2 (1)

Some of the pieces in the block are smaller than the scraps in my garbage container!

distracted

Here is where the itty bitty piece goes…

tiny piece 3

…and this is the rest of the flower!

tiny piece 4

It is a little slow-going, but it is starting to look like I am accomplishing something!

getting there

I have not done much hand-quilting since before the holidays.  It is time to get hand-quilting again!  Bruin joins me every evening as I sit and stitch the (very chilly) evening away!

bruin on couch

Til next time….

Kerry