A Productive Day!

It is not very often that I sit at my sewing machine and stitch the day away, but that is what I did yesterday!  I cut out and stitched…get ready….12 blocks from Grandmother’s Choice Block of the Week!  My plan is to make 3 quilts using these 8″ blocks, so I am stitching 3 variations of the same block.  I love to see how different fabric placement can drastically change the look of the block.  Here are the blocks:

This block is called “I Am An Anti”.  Honestly, I did not fussy cut the pink squares on purpose.  It just happened!

DSCN3595

Next on the runway is “Carrie Nation”.

DSCN3596

Followed by “Mr. Roosevelt’s Necktie”.

DSCN3597

And, last but not least, is “Jack’s Delight”.

DSCN3598

Jenny and Bruin like to keep me company when I sew.  They are kind of  famous!  Check out their youtube video here.

bruin

jenny and bruin

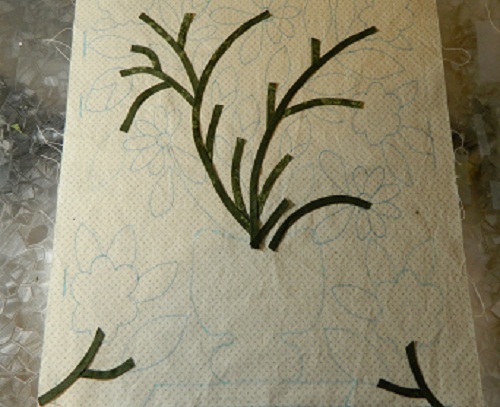
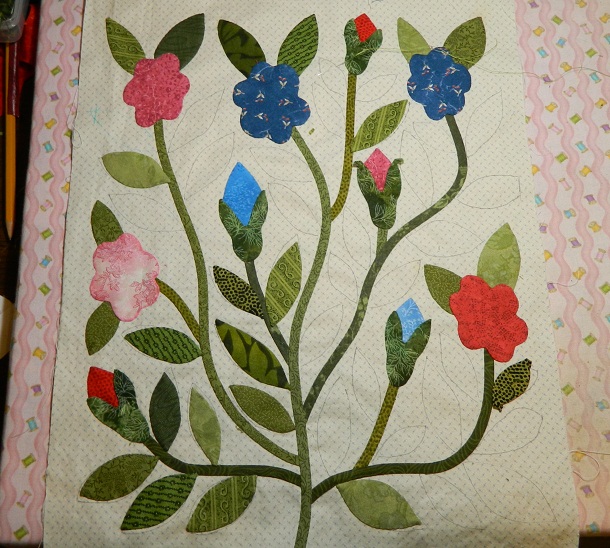
This is my latest finished block from “Bouquets For a New Day”. 5 more blocks to go!

bfand 1

The navy blue fabric in the vase is left over from an Irish Chain quilt I made for my Mom.

irish chain

Most of this block from “Civil War Bride” is stitched in place.  I started to think that maybe the table that the vase is sitting on is too dark for the overall look of the block.  So I cut out another table piece and auditioned it.  I do like it better.

cwb 1 (2)

My #1 rule in applique (and life) is this….fix something while it’s in the block stage, rather than finish the whole quilt and kick yourself because you were too busy…or too tired…or too lazy to fix it!  I have been guilty of all 3!

Til next time…

Kerry

Stitching the Night Away

Most evenings you will find me on the couch, hand-quilting the night away.  Once my needle hits the fabric, all the stress and tension of the day just seems to melt away.  Here is the latest block of Sue Garman’s “Bouquets For A New Day”.  So, now  I have 6 blocks quilted, and 6 more to go…oh… and a border.  (Heavy Sigh)

hand quilting

I have started working on the next block of Civil War Bride.  It can be tricky to figure out what order to place the stems on the background.  If the raw edge of “Stem A” is going to be covered with “Stem B”, then “Stem A” needs to be glued in place first.  (It’s easier than it sounds!!)

First, I put a few dabs of glue along the traced line, rather than putting glue on the actual stems. This will be “Stem A”. You can see that this stem will be covered by another stem.

cwb 3

Next, I carefully placed the stem on the line.  Because the stems are cut on the bias, they are easy to curve along the line.

cwb 4

Then,  I used the line that the next bias strip will be placed on as a guide to trim the stem to the correct length.  I have added a few dabs of glue to hold the next stem in place.

cwb 5

Now, another stem is in place….This is also a “Stem A”.

DSCN3521

And, finally, the longer stem that covers these shorter stems is glued in place.  This is “Stem B”.

cwb 6

So…here are a bunch of “Stem A’s”, waiting to be covered by one long “Stem B”.

glue

large stem

And, finally…all the stems are in place!

all stems in place

I thought this block needed a really special vase!   So I fussy-cut this fabric…

fabric 1

…and ended up with this vase!  Spiffy!

vase 4

Next, I added some buds….

buds

…and leaves and flowers!

buds leaves and flowers

Til next time…

Kerry

Finish a block…start a block!

Darn it!  Does this ever happen to you?  I was stitching merrily along, when I thought my stitches felt a little weird.  Then I noticed my background had folded over on itself and I was stitching through two layers.  I keep my stitch ripper handy for occasions just like this!

stitch 2

So, once the block was finally finished, I did what I do to all my finished blocks….I gave it a bath!  I like to wash everything out of my block…like glue, starch and anything else that shouldn’t be there!  First, I fill the sink with very hot water and a bit of soap.

sink 1

Next, I take a very deep breath…and then I toss my block into the water.

sink 3

I usually let it soak for a couple of hours.  Then I let the water out of the sink and rinse the block under hot water until there are no more suds.

sink 4

Next, I gently squeeze the block so it is not dripping wet, but still fairly wet.  Finally, I spread the block out on a thick towel and pin the four corners.  Then I just let it air dry.  I should mention that I pre-wash all of my fabric in Synthrapol before even beginning the block.

sink 6

sink 7

So…while the block was drying, I started the next block of Civil War Bride.  First I traced the block…

cwb 1

….then I made lots of bias.  (You can never have too much bias!)

cwb 2

Oh!  And speaking of Civil War Bride, I finally made a decision.  I chose Nest #2!  Instead of putting 5 eggs in the nest just like the pattern, I chose to add 3 eggs…an egg to represent each one of my lovely children!

nest 7

Til next time….

Kerry

A Bit of Catch-up….

This block from Civil War Bride needed a butterfly in the bottom right hand corner before it could be considered “Officially Finished”.

bird block

However, I wanted to find a really interesting fabric for the wings.  A fabric  that would do the butterfly proud!  So I waited patiently.  Then, I came across this chunk of fabric in my stash.  (For those of you who are wondering, I am taking every bit of fabric for this quilt from my stash.)  I love this type of fabric!  The pattern repeat is symmetrical, rather than asymmetrical.  These fabrics are rare, so grab them when you find them!

fussy cut 3

This dark curly part caught my eye.

fussy cut 1

I cut the butterfly wings out of the fabric so that the wings would be mirror images of each other.  I placed the pattern so that the black curly part would be somewhere near the middle of the butterfly.  The beauty of doing this, is that you never really know what you will end up with!

fussy cut 2

And here is the proud butterfly!

DSCN3497

So once I got that off my mind, I continued on with my “Friends of Baltimore” block.  I added some buds, stems and leaves.  If you look closely, you will see that I used 2 different greens for the wreath and the stems.   (Between you and I, that was a bit of an oopsy on my part.  Mum’s the word!)

wreath 1

Then came the  flowers, complete with buds and centers.

wreath 3

Next, came a pretty little bow…

wreath 4

… and, FINALLY, a couple of love birds!

wreath 5

Til next time….

Kerry

Think Happy Spring Thoughts!

I looked out the window this morning and this is what I saw!  Yikes!

snow day

So, I thought  I better get busy and think some Happy Spring Thoughts!  The next block from The Civil War Bride inspired me to think Spring!

First, I started with the branches and a few little leaves.

block 1

Then I added more leaves.

a few leaves 2

…and some more!

more leaves 3

Next, I added the bird’s feet and the underbelly of the bird. (If you let your imagination run wild, it looks like a folk art kind of bird…but just wait…!)  I used Ultra-Suede for these tiny pieces because they are really….tiny!  When using Ultra-Suede, I just cut out the pieces without adding a seam allowance and stitch it in place.  Easy peasy!

feet and underbody 4

Next came the rest of the bird.

bird 4

Then, I auditioned a few nests.  Should I choose Nest #1…….

nest 5

….or Nest # 2?nest 6

Til next time….

Kerry

Row 2 of Civil War Bride Completed!

I was one block away from finishing the  second row of  “The Civil War Bride Quilt”!   All I had to do was finish the bird block.  So I spruced the birds up with some tail feathers that I thought were rather snazzy, added some solid looking feet and gave each bird a colourful comb!

bird block

close-up birds

After I finished stitching each block, I washed it in the sink with hot soapy water to remove all of the starch, glue and even a bit of my own blood!  (Note to self…my new scissors are really sharp!)  When they were dry, I trimmed the blocks to the correct size.  (As a rule, I always cut my blocks 2″-3″ larger than needed.)  Believe it or not, the blocks do shrink up a fair amount once they are stitched.

trimming

Once they were all trimmed to the correct size, I started stitching them together.

3 blocks

5 blocks

And, finally, I stitched 2 rows together!  Spiffy!

2 rows

Since I had my sewing machine out, I took the time to stitch another block of Barbara Brackman’s “Grandmother’s Choice”.  I must confess, I am a not exactly keeping up with the weekly blocks, but I do intend to make a quilt (or two!) with the blocks …and maybe add a few applique blocks.  We will see!

GC blocks

Til next time…

Kerry

Not so fast!

I was so excited!  My block was finally finished…or was it?  I must admit, all along I thought the vase was missing a little something.  And it was!  So…here is the “unfinished” block…

almost finished

….and here is the “finished” block!

officially finished

I thought I would take a break from the flowers, and leaves and vines.  The birds on the next block of the Civil War Bride Quilt were calling my name!

First, I started with some stems and beaks, and what I assume is some sort of fruit.  (So far I am not impressed!)

DSCN3310

Next, I added some branches and leaves.  (Still not impressed!)

branches (1)

Okay, now I see it coming together!  All the birds need now are some tail feathers and they are ready for take-off!

birds

Til next time…

Kerry

A Tasty Block!

Onward and upward!  I was eager to start the next block of  The Civil War Bride Quilt, so that is what I did!  First, I traced the pattern on the background with a Clover water soluble marker.  Next, I made some stems using my 1/4″ bias maker, and then, I stitched them in place.

stems 1

I wanted skinnier stems for the cherries, so I took the stems I made with the bias maker and folded them in half lengthwise.  They are really skinny!

stems 2

Next I added some leaves and a bunch of grapes….

grapes 3

….and then I added the pears, the strawberries and the apples….I started getting a little hungry!

grapaes 5

Next, I stitched all of the remaining leaves in place.  Jenny can hardly contain her excitement!

jenny

I added the cherries and Voila!  Another completed block!

completed block

For some reason, I was craving fruit salad…so I went to the fridge and dug out a pear, some strawberries, an apple and some grapes.  I did not ave any “real” cherries, but I did have some dried cherries.

fruit

I added a few pecans and had myself a very healthy snack!

fruit salad

Til next time….

Kerry

Lots of Leaves!

The block I am working on  from the Civil War Bride had a lot of leaves on it.

a few more leaves

Boredom was starting to set in, so thank goodness I had some emergency chocolate stashed away!

chocolate

I stitched a bit…ate a chocolate…stitched a bit…ate a chocolate…until finally all the leaves and flowers were stitched in place.

finished block

I was worried that my pink flower looked a little…well….pale.  It seemed to fade into the background.

insipid

So I carefully drew around the outer edge with a pink Sharpie marker.  Much better, I think!

marker

Til next time…

Kerry

The Trouble With Vacations….

Vacations are wonderful….except they come to an end!

This year, we decided to do something really different for our winter vacation.  On January 25, Paul and I left the Canadian winter behind and flew to Antigua, where we spent two absolutely awesome weeks aboard The Amoeba,  a 67′  schooner owned by John and Bev Bryson.  We had the pleasure of meeting John and Bev earlier this past summer when we went for a sunset cruise on The Amoeba while visiting family in Baddeck, Nova Scotia.

AMOEBA

When we weren’t on the sailboat, we were on the beach….

PARADISE

…or buying fabric!  Who could resist?

BUYING FABRIC

BIRD FABRIC

Of course, wherever I go, I take my applique with me!

TIME TO STITCH

TIME TO STITCH 2

So now it is time to get back to reality and do some serious stitching!  I woke up this morning with the next block of Civil War Bride on my mind.

First I stitched the stems in place.

STEMS

Then I added some colourful buds.

BUDS

The many, many leaves are prepped and ready to go!

LEAVES 1

Til next time….

Kerry