Stitching the Night Away

Most evenings you will find me on the couch, hand-quilting the night away.  Once my needle hits the fabric, all the stress and tension of the day just seems to melt away.  Here is the latest block of Sue Garman’s “Bouquets For A New Day”.  So, now  I have 6 blocks quilted, and 6 more to go…oh… and a border.  (Heavy Sigh)

hand quilting

I have started working on the next block of Civil War Bride.  It can be tricky to figure out what order to place the stems on the background.  If the raw edge of “Stem A” is going to be covered with “Stem B”, then “Stem A” needs to be glued in place first.  (It’s easier than it sounds!!)

First, I put a few dabs of glue along the traced line, rather than putting glue on the actual stems. This will be “Stem A”. You can see that this stem will be covered by another stem.

cwb 3

Next, I carefully placed the stem on the line.  Because the stems are cut on the bias, they are easy to curve along the line.

cwb 4

Then,  I used the line that the next bias strip will be placed on as a guide to trim the stem to the correct length.  I have added a few dabs of glue to hold the next stem in place.

cwb 5

Now, another stem is in place….This is also a “Stem A”.

DSCN3521

And, finally, the longer stem that covers these shorter stems is glued in place.  This is “Stem B”.

cwb 6

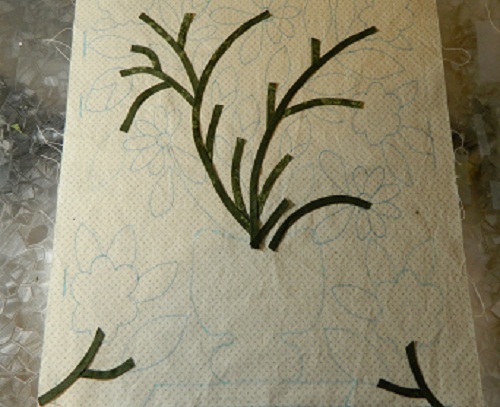
So…here are a bunch of “Stem A’s”, waiting to be covered by one long “Stem B”.

glue

large stem

And, finally…all the stems are in place!

all stems in place

I thought this block needed a really special vase!   So I fussy-cut this fabric…

fabric 1

…and ended up with this vase!  Spiffy!

vase 4

Next, I added some buds….

buds

…and leaves and flowers!

buds leaves and flowers

Til next time…

Kerry

A Good Way to Spend the Evening!

It was going to be a very exciting evening!  I have completed another four  blocks from Sue Garman’s “Friend’s of Baltimore” and they are ready to be stitched together into a row.  I already have one row stitched together.  You can read about that here.  When I cut my background blocks, I always cut them 2″ or 3″ larger than the finished size.  So, before I could stitch the blocks together, I had to trim them down to the correct size.  Here is what I did to make the job so easy and stress-free…The best part is, I never had to measure anything!

I made a window template  with the opening the exact measurement of the unfinished size of the block.  The finished size is 15″, so I needed to trim the blocks down to 15 1/2″, therefore I made the opening 15 1/2″.  (I hope that makes sense!)

trim 2 (1)

So now I could place the window template on the block and make sure that everything was centred nicely.

trim 4 (2)

Next, I traced around the opening with a marking pen.

trim 7

Then I trimmed the excess fabric away by cutting on the marked line.  Easy peasy!

trim 5

trim 6

So, once I trimmed all the blocks to the correct size, I started to stitch the blocks together in a row.

r rows (2)

Ta da!   An evening well spent!

r rows (1)

Til next time…

Kerry

Finish a block…start a block!

Darn it!  Does this ever happen to you?  I was stitching merrily along, when I thought my stitches felt a little weird.  Then I noticed my background had folded over on itself and I was stitching through two layers.  I keep my stitch ripper handy for occasions just like this!

stitch 2

So, once the block was finally finished, I did what I do to all my finished blocks….I gave it a bath!  I like to wash everything out of my block…like glue, starch and anything else that shouldn’t be there!  First, I fill the sink with very hot water and a bit of soap.

sink 1

Next, I take a very deep breath…and then I toss my block into the water.

sink 3

I usually let it soak for a couple of hours.  Then I let the water out of the sink and rinse the block under hot water until there are no more suds.

sink 4

Next, I gently squeeze the block so it is not dripping wet, but still fairly wet.  Finally, I spread the block out on a thick towel and pin the four corners.  Then I just let it air dry.  I should mention that I pre-wash all of my fabric in Synthrapol before even beginning the block.

sink 6

sink 7

So…while the block was drying, I started the next block of Civil War Bride.  First I traced the block…

cwb 1

….then I made lots of bias.  (You can never have too much bias!)

cwb 2

Oh!  And speaking of Civil War Bride, I finally made a decision.  I chose Nest #2!  Instead of putting 5 eggs in the nest just like the pattern, I chose to add 3 eggs…an egg to represent each one of my lovely children!

nest 7

Til next time….

Kerry

A Bit of Catch-up….

This block from Civil War Bride needed a butterfly in the bottom right hand corner before it could be considered “Officially Finished”.

bird block

However, I wanted to find a really interesting fabric for the wings.  A fabric  that would do the butterfly proud!  So I waited patiently.  Then, I came across this chunk of fabric in my stash.  (For those of you who are wondering, I am taking every bit of fabric for this quilt from my stash.)  I love this type of fabric!  The pattern repeat is symmetrical, rather than asymmetrical.  These fabrics are rare, so grab them when you find them!

fussy cut 3

This dark curly part caught my eye.

fussy cut 1

I cut the butterfly wings out of the fabric so that the wings would be mirror images of each other.  I placed the pattern so that the black curly part would be somewhere near the middle of the butterfly.  The beauty of doing this, is that you never really know what you will end up with!

fussy cut 2

And here is the proud butterfly!

DSCN3497

So once I got that off my mind, I continued on with my “Friends of Baltimore” block.  I added some buds, stems and leaves.  If you look closely, you will see that I used 2 different greens for the wreath and the stems.   (Between you and I, that was a bit of an oopsy on my part.  Mum’s the word!)

wreath 1

Then came the  flowers, complete with buds and centers.

wreath 3

Next, came a pretty little bow…

wreath 4

… and, FINALLY, a couple of love birds!

wreath 5

Til next time….

Kerry

Think Happy Spring Thoughts!

I looked out the window this morning and this is what I saw!  Yikes!

snow day

So, I thought  I better get busy and think some Happy Spring Thoughts!  The next block from The Civil War Bride inspired me to think Spring!

First, I started with the branches and a few little leaves.

block 1

Then I added more leaves.

a few leaves 2

…and some more!

more leaves 3

Next, I added the bird’s feet and the underbelly of the bird. (If you let your imagination run wild, it looks like a folk art kind of bird…but just wait…!)  I used Ultra-Suede for these tiny pieces because they are really….tiny!  When using Ultra-Suede, I just cut out the pieces without adding a seam allowance and stitch it in place.  Easy peasy!

feet and underbody 4

Next came the rest of the bird.

bird 4

Then, I auditioned a few nests.  Should I choose Nest #1…….

nest 5

….or Nest # 2?nest 6

Til next time….

Kerry

“Finish me! Finish me!”

This block from Sue Garman’s “Friends of Baltimore” was staring at me from the design wall.  It was saying: “Finish me!  Finish me!”  So I did.

almost finished

I had not gotten around to adding the section to the front of the book.  I was afraid it was going to be a little… fiddly. (Definition of fiddly: requiring close attention to detail : fussy; especially : requiring an annoying amount of close attention).  It was!

pattern

Here is what I did.  I ironed a piece of freezer paper to the back of the fabric that I was going to write “Album” on.  I did this so the fabric would not slip around while I was writing on it.

album 2

Using my light box, I traced the word “Album” with a permanent marker.

album 3

I traced the finished line with a Frixion marker, so that line would eventually disappear.

album 4

Bruin likes to pay close attention to the details!

album 8

Next, I took the freezer paper template and ironed it to the back of the fabric with the writing on it.  I used the line I drew with the Frixion marker to place the freezer paper template in the correct spot.

album 6

album 7

Once that was all done, I prepped the piece as usual.

album 9

Next, I prepped the beige piece…

album 11

….and here we go…An Officially Finished Block!

finished album

Til next time…

Kerry

How wrong was I??

Very wrong!  I had been wanting to start the next block of Sue Garman’s “Friend’s of Baltimore”.  Well!  I took one look at the block…and walked away!  It looked way too difficult.  Boy, was I wrong.

In fact, it was not difficult at all…almost a walk in the park!  Here is the freezer paper template. Yikes!

pattern 1

And here is the template ironed on to the wrong side of the fabric.  So far, so good!

pattern 2

I thought this is where it might get a bit dicey.  So instead of cutting out the entire design, I just cut a small portion and starched the seam allowance in place.

pattern 3

The next thing I knew, I was finished the inner part!

pattern 4

So I worked on the outer section until the whole piece was prepped!

pattern 6

I took a deep breath and removed the freezer paper…

pattern 7

And this tangled mess….

pattern 8

…turned in to this!

pattern 9

I would  like to thank the quilt gods for helping make this possible!!

Til next time…

Kerry

Not so fast!

I was so excited!  My block was finally finished…or was it?  I must admit, all along I thought the vase was missing a little something.  And it was!  So…here is the “unfinished” block…

almost finished

….and here is the “finished” block!

officially finished

I thought I would take a break from the flowers, and leaves and vines.  The birds on the next block of the Civil War Bride Quilt were calling my name!

First, I started with some stems and beaks, and what I assume is some sort of fruit.  (So far I am not impressed!)

DSCN3310

Next, I added some branches and leaves.  (Still not impressed!)

branches (1)

Okay, now I see it coming together!  All the birds need now are some tail feathers and they are ready for take-off!

birds

Til next time…

Kerry

How Crazy Am I?

As I work away on Sue Garman’s “Friends of Baltimore”, I keep asking myself…”How crazy am I?”  These teeny, weensy pieces are a little…..tiny!   This is the actual freezer paper pattern.

freezer paper 1

First I made the tiny outer blue circle.

blue outer circle

Then, the teeny, tiny yellow inner circle.

finished yellow circle

Here is the flower, before the centre is added.

flower before

And here is the finished flower!

flower after

This is what I have accomplished so far!

vase 3

I have been working very steadily on Sue Garman’s “Bouquets For A New Day”.  Here is another finished block…

block

…and here is what I have completed so far!  It is starting to have an “almost finished” look to it!

blocks

Til next time…
Kerry

So darn excited!

I am really excited to be working on the next block of Sue Garman’s “Friends of Baltimore”.  When I finish this block, I will be able to stitch together another row, which I can then add to my first completed row!  I am going to start hyper-ventilating real soon!

rows

First I started with the vase.  The dark brown piece at the top was the first one to be stitched in place, and then the pieces below it followed.

vase 1

Next, the remaining dark brown pieces were stitched in place.  The long edges will be covered by the light brown sections, so the edges do not need to be turned under.

vase 2

vase 3

And, finally, the last section is added.  The top edge looks odd, but will be covered with flowers and leaves.

vase 4

Next, the handles were added and some stems and leaves.  Please allow me to gush about these leaves! I fussy-cut  each leaf with the lighter green “veins” running lengthwise.  I am pleased as punch!

vase 7

Now that the berries are in place, I can start to fill the vase with many, many flowers!

vase 8

I can’t think of a better way to spend the cold winter evening than hand-quilting Sue Garman’s “Bouquets For A New Day”.  Here is another completed block!

bouquet for a new day

Til next time…

Kerry